Integrate NodePing Alerts with Matrix

In this post, I will show you how you can get NodePing webhook alerts integrated with a Matrix server. In this demonstration, I will be focusing on the matrix-synapse server and Element client, namely, Element’s hosted web client for configuring Matrix to receive NodePing alerts. Matrix comes with some SDKs that can be used to more programmatically handle events and create bots, but I want to provide an option that doesn’t take much effort to set up.

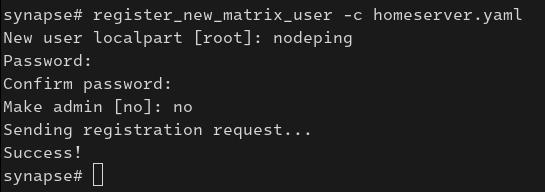
To get started, I created a new account on my home server. This account will be the one that is receiving the webhooks and sending messages to the room. Think of it as a bot, and not a user to use on the daily. I followed the instructions from the synapse documentation to create a new user. For security purposes, I run a home server with registration disabled. I chose the alternate method of running `register_new_matrix_user` to create the new user, that way I did not have to enable registration on my server.

Now that I have the new user created, I signed into Element with the account I created and proceeded to create a private room.

I made the room invite only, and left end-to-end encryption enabled, though end-to-end encryption is optional. After the room is created, I invited the users to the group that I wanted to receive the alerts.

Creating the Webhook Contact

Now that I have my notifications user in place and users invited to the room, it is time to integrate Matrix with NodePing. I need 2 pieces of information:

  1. The room ID
  2. The “bot” user’s access token

Getting the Room ID

The Room ID is created when the room was created. I need to go to the settings menu for that room to get the ID. First, I click on the room’s 3-dot button so I can go to settings

Then, I go to Advanced to get the Internal room ID

Next, I need to get the Access Token for my user. This is a secret token you do not want to share with anyone. However, it will be used as part of my webhook contact. I went to the quick settings menu for my user that will be sending the NodePing alerts and selected “More options”:

I went to the Help & About menu and scrolled down to the bottom to get to the Access Token section. I copied the access token out. I also made note of the Homeserver mentioned below in the Advanced section. The Homeserver, Access Token, and Room ID are going to be needed in the next step to create the webhook.

Creating the Contact

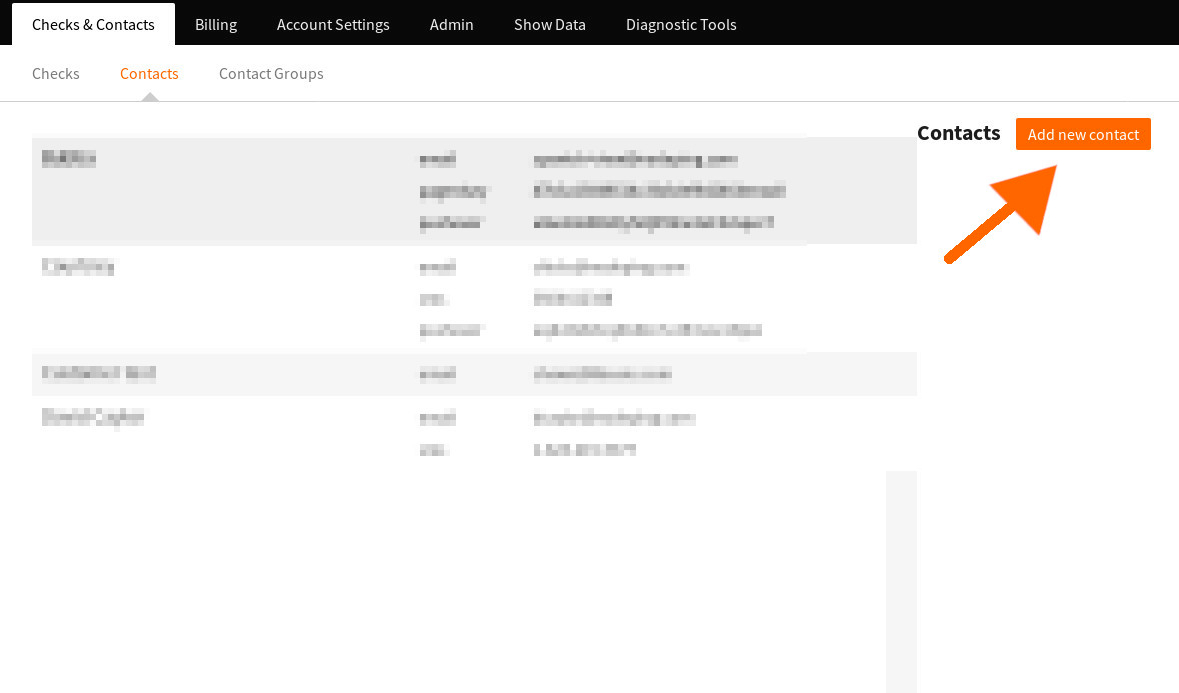
Next, I signed into my NodePing account and selected Contacts, and Add new contact:

I gave my contact a name. Then I clicked the dropdown menu and selected Webhook. That shows another dropdown for Preset Services. I chose Matrix and clicked Apply Template. The default URL should be something like:

https://matrix.org/_matrix/client/r0/rooms/%5Byour encoded internal room id]/send/m.room.message

I am not using the default https://matrix.org home server, so I changed that. However, if you are using the default home server, keep matrix.org. Next I need to replace [your encoded internal room id] with the Room ID. The Room ID needs to be URI encoded. The “!” needs to be changed to “%21” and the “:” to “%3A”, like below

!abcde123456789:matrix.org

%21abcde123456789%3Amatrix.org

The final URL will look something like this:

https://matrix.org/_matrix/client/r0/rooms/%21abcde123456789%3Amatrix.org/send/m.room.message

Next I went to the Headers tab. There is a value with [YOUR AUTH HERE] in the Authorization header that needs to be replaced with the access token. I pasted in my access token. I kept the Body as the default. With the homeserver correctly set, the room ID in the POST URL, and the Authorization header set, I saved the check.

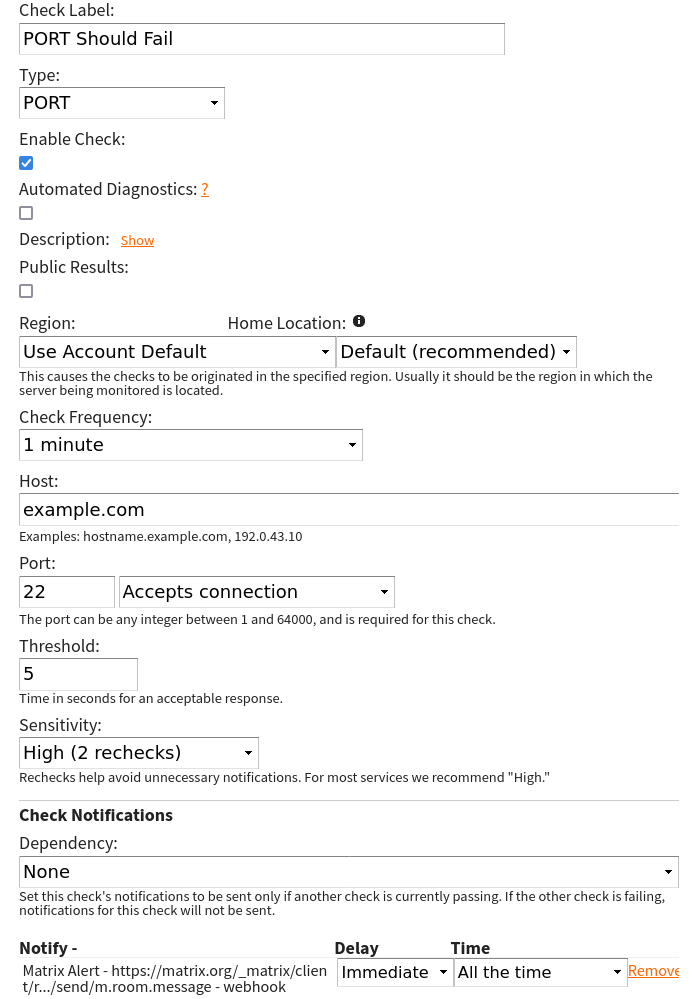
I created a check that I knew would fail intentionally and assigned the Matrix contact to the check and let it fail so I could get the alert and ensure it is working properly.

This confirms that the contact works, and now I can start assigning this contact method to my checks.

Some Useful Uses

Using with Notification Profiles

One thing I like to do is have two identical contact methods, but in one I add “IMPORTANT” to the body like below

{"body": "NodePing IMPORTANT: – {label}: {type} is {event}","msgtype": "m.text"}

This lets me do some tricks with notification schedules and notification sounds in Element. Maybe for some checks, I want to get notifications all the time, but I do not want the sound alert on my phone at certain times of the day. On my checks I have my Matrix contact that does not have “IMPORTANT” in the message send a notification all the time. However, the one that has “IMPORTANT” in the message will send on a certain schedule. In the Notifications settings on Element I created a keyword “IMPORTANT”, and then on the room I set notifications to only happen with Mentions & Keywords. That way, the messages sending all the time will not send an audible notification, but the messages with “IMPORTANT” will send me an audible notification.

Communicating About Incidents

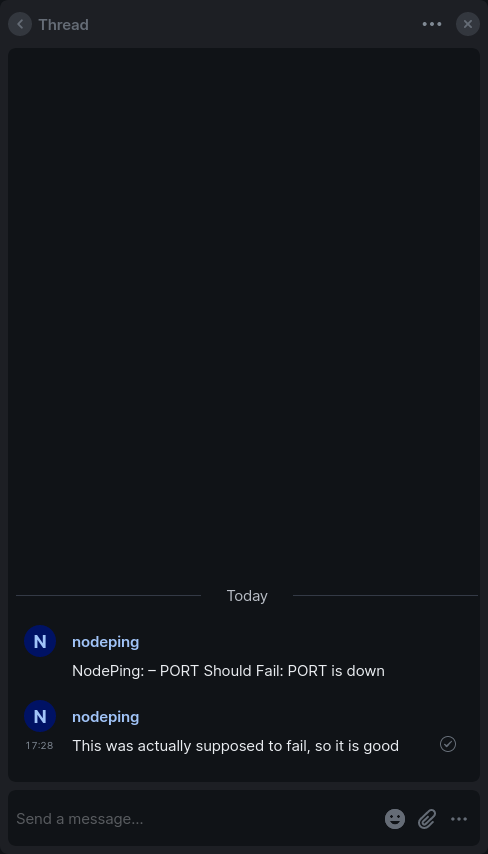
With the Threads feature, when there is an incident, I can start a thread on that notification and communicate with the team about that incident, or I can make comments on the incident for future reference. This allows for convenient communication about an incident while not spamming the timeline where alerts are being displayed.

If you need help getting things working right, please let us know at support@nodeping.com.  If you don’t yet have a NodePing account, please sign up for our free 15-day trial.

Notification Profiles

If you often need to add, remove, or change the same notifications on multiple checks, our new notification profiles will save you a lot of time and effort.

You can specify multiple notifications, contact methods or groups and their delays and schedules, in a notification profile and then assign that profile to checks. When you need to change the notifications, simply change it in the profile without having to edit those checks.

Notification profiles are also available through our API and can simplify the creation of checks.

NodePing uptime notifications are fast and accurate. If you do not have a NodePing account, please sign up for our 15-day, free trial and you’ll be the first to know when your services are offline.

Mute Notifications

If it’s server migration or vacation time, it might be time to mute some notifications. NodePing has two new features to help you silence alerts.

Getting actionable alerts from your uptime monitoring to the right people and systems at the right time is an important part of service recovery. Sending unactionable notifications should be avoided as much as possible.

The first new feature is muting notifications on checks. If you know a service is going to be down or flapping you can quiet the notifications on specific checks by clicking on “Mute” in the check edit modal. None of the configured notifications will be sent while the check is muted. You can optionally have the notifications automatically re-enabled as well.

The second new feature is similar but applies to contact methods. For example, if an employee is going on vacation you can mute all notifications to a specific contact method by clicking on the “mute” link in the contact edit modal. When they return, simply click on the ‘unmute’ link to re-enable. You can also optionally have it automatically re-enable notifications for that contact method after a specific time has elapsed.

Both these feature are available now in all NodePing plans and are supported in our API, including Python and Elixir libraries.

If you don’t have a NodePing account, please sign up for our free, 15-day trial and find out how NodePing can help you maximize uptime by reducing failure response times.

Twitter notifications to stop working on 2018-08-15

Twitter API changes set for August 16, 2018 will result in NodePing no longer being able to reliably send direct message notifications. The new API endpoint allows only 5 DMs per user per 24 hours. If you’d like to receive NodePing notifications via direct message, please consider letting twitter know how these changes affect you.

NodePing has many other notification methods available.

Threaded Notification Emails

We have a new feature to make it easier to keep track of email notifications. Previously, each email notification started a new email thread or conversation, even if it was just reported that a formerly reported down check was now up. Now, our Business and Provider plans have the option of grouping these emails together through Branding. If you got a “Host Down” email, for example, you can set the “Host Up” message to be sent as a reply to the original email. This feature was made with the goal of keeping track of email notifications easier.

On the back end, we’ve added message references to our emails so your email client knows that the “Up” message is related to the “Down” message.

However, not all email systems will identify that messages are related to each other just based on the “reply-to” and “references” ID’s.  For gmail and some other email services, in order to enable this feature,  you’ll need to adjust your NodePing settings to make your up and down email subject lines identical.  To do this, first login to your NodePing account. Then go to the Account settings tab, then the Branding tab under it.  All you need to do to receive your up and down emails on the same thread is set their subject lines to match. Scroll down to Up Notifications: Email “Message Subject:”and set it to match Down Notification: Email’s “Message Subject:”, or vice versa. Or, you could set their subject line to be something else entirely; the important thing is that they are identical.

By the way, the notification branding lets you do a lot more besides just make the subject lines match for message threading.  You can customize what your notifications say and what information is included.  There’s more information about this powerful feature in our documentation.

We hope you find this feature helpful. If you haven’t tried NodePing yet, you can get a free fifteen-day trial here. If you have questions or comments, email us at support@nodeping.com.

Telegram Notifications

This post will provide instructions on how to get NodePing notifications via Telegram using NodePing Webhooks and Telegram Bots.  Webhooks are available in our Business and Provider plans.

The Telegram Bot system is very useful for integrating with Telegram. Nodeping webhooks work seamlessly with the Telegram Bot to send ‘down’ and ‘up’ notifications. It’s a great alternative to SMS that is also cross-platform.

First, you will need to set up a Telegram account for yourself if you haven’t already. This can be done by getting the app on your mobile device or computer (there are Windows/macOS/Linux clients, as well as unofficially supported for FreeBSD). A working phone number will be required to set up an account.

Next, you need to create your own Telegram Bot.  To do this, you’ll have to to chat with Telegram’s own BotFather (a bot that creates other bots – the end is nigh!) You can find it by typing “@BotFather” into the user search bar in Telegram. Once you have started a chat with it, you will be prompted with a message from the BotFather.

Create your own bot by simply typing “/newbot” and following the instructions that are given. Here is a screenshot of what setting up a new bot setup looks like:

That long token is important.

Now that you have your new Telegram Bot and token, you’ll need to get the ChatID for the user or channel you want to send notifications to. This can be done by starting a chat with your new bot inside Telegram. You would start the chat like you did with BotFather, by typing in @nameofyourbot. Click on your bot, and select “Start” to begin a chat with your bot. Next, you will have to send a single message to the bot. A simple “hello” will suffice. With that done, you can get the ChatID by visting the URL that shows your bot’s updates.  That URL will look like:

https://api.telegram.org/bot<your-secret-bot-token>/getUpdates

Plop that in your browser and you’ll get back some text – JSON formatted text. Look through the JSON response for the ChatID. It will be a random number. It is the “id” in the “chat” object.

Now that you have the ChatID, you’ll need to configure a new Webhook in NodePing. Log in and go to the Contacts tab. Add a new contact and give it a name – like “Telegram Bot”. Select the “Webhook” notification type and change the action to “POST”. Enter the following value in the URL field (replacing <your-secret-bot-token> with… you know, your bot token):

https://api.telegram.org/bot<your-secret-bot-token>/sendMessage

Next, in the Headers section add a new key called “Content-Type” and the value of “application/json”. It should look like this:

Then click on the the Body section.  In the text area, you need to add the following JSON.

{"chat_id":"<your-ChatID>","text":"NodePing: - {label}: {type} is {event}"}

Then save your newly minted webhook.  It’s ready to be added to the notification section of your checks.

Now you can receive NodePing notifications via Telegram!

Your alerts will look something like this.

Telegram bots have a lot more functionality that you can read about.  NodePing webhooks can also do a lot more, like templating and conditional statements, which you can read about.

If you need help getting things working right, please let us know at support@nodeping.com.  If you don’t yet have a NodePing account, please sign up for our free 15-day trial.

[Updated 2023-07-26]

Notification Escalations on NodePing

Most systems run smoothly most of the time.  Servers keep running.  Web sites serve pages and deliver data from backend databases.  DNS servers respond to queries with hardly any delay at all.  Email flows smoothly.

Emergency_light_with_grillIt’s that tiny percent of the time that it doesn’t work that way that causes the heartburn.  A server that has been running just fine for months suddenly hiccups.  But even when that happens, it’s usually a hiccup.  The person who is the first line of responsibility for that service needs to know right away.  They jump on it, clear the problem, and things go back to humming like normal.  You need fast and reliable monitoring to help keep these interruptions to service short.  A lot of times, the service is back to normal before most people realize there was an issue.  These incidents likely go in a report, but the rest of the team doesn’t need to get involved.  Its dealt with, duly noted, and life goes on.

Then there are the times that something goes really wrong.  The first line is working on it, but the server isn’t going to be back up in a minute or two.  Or the first line person is not available.  Maybe he’s in accounting trying to sort out his paperwork for credit card expenses for last month.  Someone else needs to know that things are down.

Sometimes these situations turn into real disasters.  The website is down.  Upper management is going to be calling, wondering who’s spilling revenue out on the server room floor.  The manager getting that call wants to know about it before the phone rings with that call.

Most monitoring systems use escalating notifications to handle these situations.  If a system is down, the first line person should be notified immediately.  If it’s down for a few minutes, the people who back him up need to be brought in.  If it’s down longer than that, systems management will want to get a heads up.

NodePing uses the notification delay feature to provide notification escalations.  A delay can be set on each notification contact for each check.  The NodePing notification delay feature notes that a check set with a delayed notification has gone down.  After the delay interval has been reached, if the check is still “down” we send the notification to that contact.

Set up the first line systems with no delay, so they’ll get notified when the system goes down right away.  If the service hasn’t recovered in a few minutes, send a notification to the systems group using a contact group.  Then, if the service hasn’t recovered in 10 minutes (or whatever the tolerance for the service being down is for this service in your organization), notify the systems management.

The notification delay feature can be used for other things besides notifications.  Sometimes services have a higher tolerance for transient interruptions.  You can use the delay to mean “if this service is down shorter than 3 minutes, I don’t need to be notified.”  This is useful, for example, for services in remote locations where Internet connectivity can have brief interruptions.  But our most common request for using the delays are for notification escalations.


Notification Dependencies

Oh no! A power supply failure has taken your website server offline and here comes 120 HTTP ‘down’ notifications from NodePing. When a major outage hits, the last thing you need is an alert flood for all the checks you already know are bound to fail.

When a check depends on other services or networks, you don’t need more notifications that it’s failing when you already know the service that it depends on is failing. NodePing recently released a new feature called ‘Notification Dependency’ to help mitigate that unhelpful alert flood.

Set a ‘Notification Dependency’ on your checks when you want to suppress notifications for checks that depend on another check for availability. Web sites on the same web server can all be set to have their HTTP checks dependent on the server PING check. Or, you can set server PING checks to be dependent on the network router PORT check. If the dependent check is failing, no notifications will be sent for the check. The checks will still fail, only alerts won’t be sent for those failures.

Choose your dependent check from the ‘Dependency’ dropdown in the ‘Notifications’ section of the check edit modal and then ‘Save’ your changes for that check.

Notification dependencies are another way to help you receive only actionable alerts for your uptime monitoring and are available to all NodePing customers.

If you aren’t using NodePing server monitoring yet, sign up for your free, 15-day trial today.

Delayed Notifications

NodePing now offers delayed notifications for your uptime monitoring. This is a powerful new feature that will help make your notifications actionable. There are two primary use cases for delayed notifications: flapping services and escalating notifications.

Flapping Services
Not all services or networks are rock solid. Sometimes three or even two nines is “good enough”. Some locations have inherently lower expectations for availability or are just prone to frequent, short-lived outages. When a check often fails but recovers by itself quickly (flaps), it’s difficult to get actionable notifications.

Adjusting the check sensitivity setting down is useful to give your check more time to recover but if unassisted recovery takes longer than a minute the check will still likely fail. Use delayed notifications for flapping checks to receive alerts only when services are ‘really’ down. You can configure NodePing to send a alerts if your check remains down after say 5 minutes. Set the delay (from 1 minute to 1 hour) to your tolerance and receive only alerts when human intervention is required.

Escalating Notifications
Not everyone needs to know about every outage right away. If the sysadmin on call can get the site back up within a few minutes, there’s no action required by senior staff or for the help desk to be informed. If an outage lasts longer, however, you may need to let your boss know things are still offline or give a heads up to the help desk that there are issues on the website and to expect some calls. Use delayed notifications to set escalating alerts to others if an outage continues.

You can even escalate alerts to yourself. I have several checks set to email me immediately and then send me an SMS if they’re still failing after 5 minutes and a voice call if the outage lasts longer than 10 minutes.

Setting Notification Delays
When editing a check, you’ll see the contact method drop down in the ‘Notifications’ section of each check. Choose a contact method and the ‘Delay’ and ‘Schedule’ dropdowns will also appear. You can set different delays on the same contact method by adding additional lines with the same contact method.

Actionable Alerts
Delayed notifications can be useful to make all your alerts more actionable. If your contacts are ignoring NodePing notifications, they’ll succumb to alert fatigue and eventually ignore a truly important notification.

If you need any help tuning your checks to avoid flapping or adjusting your notifications to make them more actionable, please reach out to us at support@nodeping.com. We really are happy to help.

If you aren’t using NodePing for uptime monitoring yet, please sign up for our 15-day, free trial and let us help you increase your uptime.

Site update and feature releases Oct 2016

We’ve rolled out some UI and feature updates for NodePing today. We hope you find them helpful. I’ll summarize the changes here. Look here for future posts, which will go into more details for each.

Delayed Notifications:
You can now set a delay on ‘down’ alerts. This will help make your notifications more actionable for frequently flapping services. This new feature can also be used to escalate alerts or notify support/management if services remain offline. This feature has been available for a while in our API, but hasn’t been in our documentation, and has now been added to our UI as well. See the ‘Delay’ drop down in the Notification section of your check.

Check Cloning:
You can now clone an existing check, with all its settings, in our UI to create a new check. This will help reduce “clickty-clickty” syndrome when setting up a lot of checks with similar settings. Click on the label of the check you want to clone to display the details to reveal the ‘Clone Check’ link on the far right.

Notification Dependencies:
When an edge router or server fails, it’s assumed that all the services that depend on them will also fail. It’s not helpful to receive hundreds of alerts for dependent services. You can now set another check as a notification dependency on each check. If the dependent check is already failing, notifications will be suppressed. Use this to avoid alert floods when bottleneck services fail. You can find the ‘Dependency’ drop down in the Notification section of each check.

Disable All Notifications:
There is now a link in the Contacts tab to “Disable notifications”. Use this to suppress all alerts until you re-enable them using the same link. It’s another way to help avoid the distraction of alert floods during big outages.

Disable Checks:
Now you can disable multiple checks with one click. You’ll find the “Disable All Checks” link in the Account Settings – General Settings tab. You can also apply filters based on label, target, or check type to, for example, disable all PING checks or all checks pointing to “example.com”. Use this to disable checks during planned outages/maintenance or to quiet down your logs when troubleshooting.

All the above new features, except check cloning, are also available via our API. If you have any questions about these new features, reach out to support@nodeping.com; we’re happy to help.