Integrate NodePing Alerts with Matrix

In this post, I will show you how you can get NodePing webhook alerts integrated with a Matrix server. In this demonstration, I will be focusing on the matrix-synapse server and Element client, namely, Element’s hosted web client for configuring Matrix to receive NodePing alerts. Matrix comes with some SDKs that can be used to more programmatically handle events and create bots, but I want to provide an option that doesn’t take much effort to set up.

To get started, I created a new account on my home server. This account will be the one that is receiving the webhooks and sending messages to the room. Think of it as a bot, and not a user to use on the daily. I followed the instructions from the synapse documentation to create a new user. For security purposes, I run a home server with registration disabled. I chose the alternate method of running `register_new_matrix_user` to create the new user, that way I did not have to enable registration on my server.

Now that I have the new user created, I signed into Element with the account I created and proceeded to create a private room.
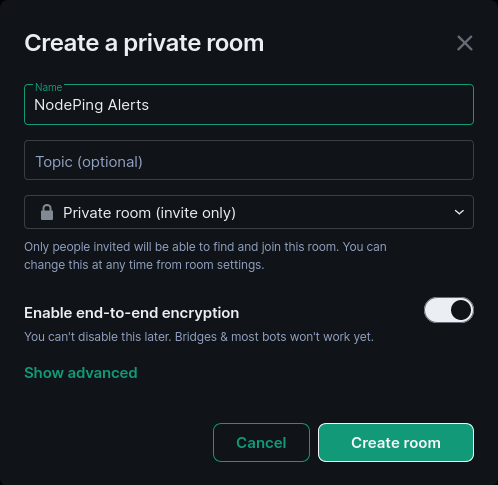
I made the room invite only, and left end-to-end encryption enabled, though end-to-end encryption is optional. After the room is created, I invited the users to the group that I wanted to receive the alerts.

Creating the Webhook Contact

Now that I have my notifications user in place and users invited to the room, it is time to integrate Matrix with NodePing. I need 2 pieces of information:

  1. The room ID
  2. The “bot” user’s access token

Getting the Room ID

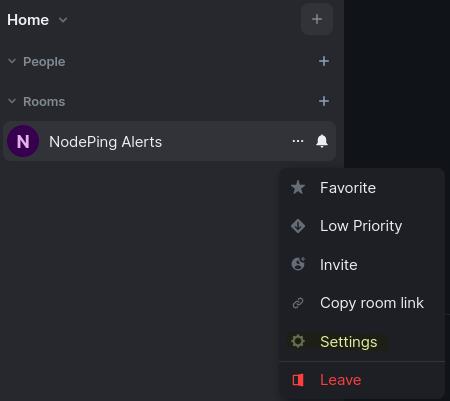
The Room ID is created when the room was created. I need to go to the settings menu for that room to get the ID. First, I click on the room’s 3-dot button so I can go to settings
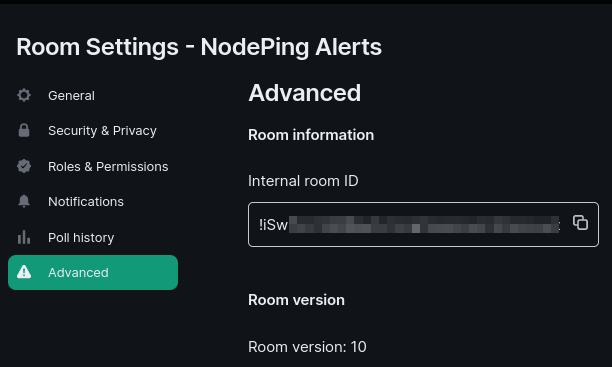
Then, I go to Advanced to get the Internal room ID
Next, I need to get the Access Token for my user. This is a secret token you do not want to share with anyone. However, it will be used as part of my webhook contact. I went to the quick settings menu for my user that will be sending the NodePing alerts and selected “More options”:

I went to the Help & About menu and scrolled down to the bottom to get to the Access Token section. I copied the access token out. I also made note of the Homeserver mentioned below in the Advanced section. The Homeserver, Access Token, and Room ID are going to be needed in the next step to create the webhook.

Creating the Contact

Next, I signed into my NodePing account and selected Contacts, and Add new contact:

I gave my contact a name. Then I clicked the dropdown menu and selected Webhook. That shows another dropdown for Preset Services. I chose Matrix and clicked Apply Template. The default URL should be something like:

https://matrix.org/_matrix/client/r0/rooms/%5Byour encoded internal room id]/send/m.room.message

I am not using the default https://matrix.org home server, so I changed that. However, if you are using the default home server, keep matrix.org. Next I need to replace [your encoded internal room id] with the Room ID. The Room ID needs to be URI encoded. The “!” needs to be changed to “%21” and the “:” to “%3A”, like below

!abcde123456789:matrix.org

%21abcde123456789%3Amatrix.org

The final URL will look something like this:

https://matrix.org/_matrix/client/r0/rooms/%21abcde123456789%3Amatrix.org/send/m.room.message

Next I went to the Headers tab. There is a value with [YOUR AUTH HERE] in the Authorization header that needs to be replaced with the access token. I pasted in my access token. I kept the Body as the default. With the homeserver correctly set, the room ID in the POST URL, and the Authorization header set, I saved the check.

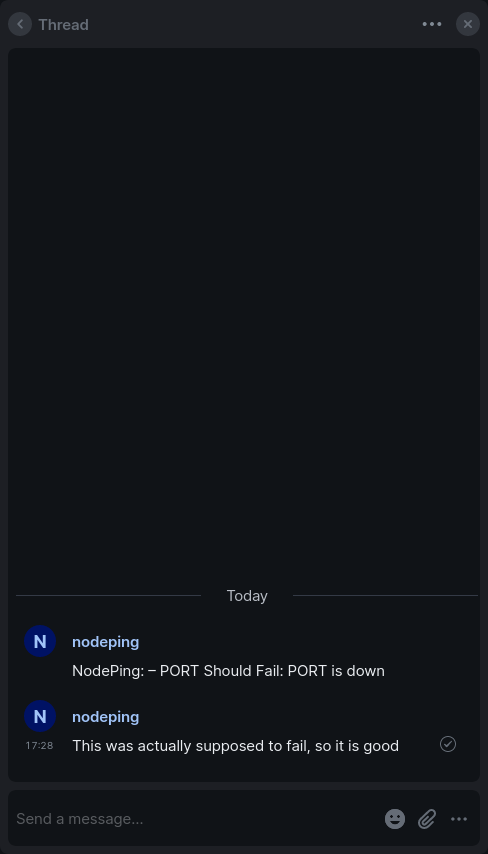
I created a check that I knew would fail intentionally and assigned the Matrix contact to the check and let it fail so I could get the alert and ensure it is working properly.
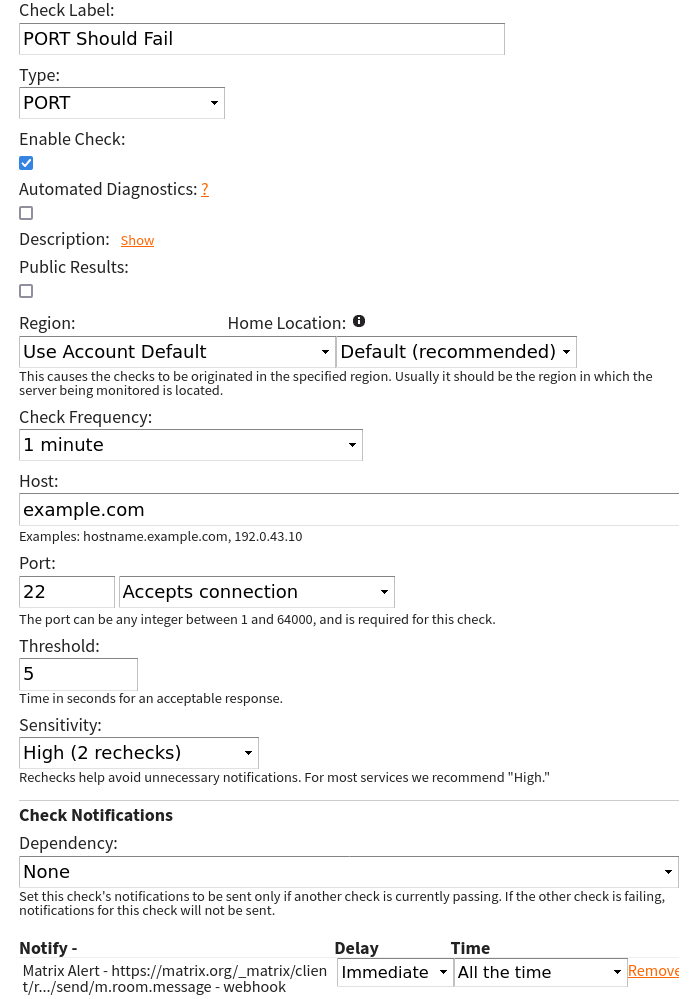
This confirms that the contact works, and now I can start assigning this contact method to my checks.

Some Useful Uses

Using with Notification Profiles

One thing I like to do is have two identical contact methods, but in one I add “IMPORTANT” to the body like below

{"body": "NodePing IMPORTANT: – {label}: {type} is {event}","msgtype": "m.text"}

This lets me do some tricks with notification schedules and notification sounds in Element. Maybe for some checks, I want to get notifications all the time, but I do not want the sound alert on my phone at certain times of the day. On my checks I have my Matrix contact that does not have “IMPORTANT” in the message send a notification all the time. However, the one that has “IMPORTANT” in the message will send on a certain schedule. In the Notifications settings on Element I created a keyword “IMPORTANT”, and then on the room I set notifications to only happen with Mentions & Keywords. That way, the messages sending all the time will not send an audible notification, but the messages with “IMPORTANT” will send me an audible notification.

Communicating About Incidents

With the Threads feature, when there is an incident, I can start a thread on that notification and communicate with the team about that incident, or I can make comments on the incident for future reference. This allows for convenient communication about an incident while not spamming the timeline where alerts are being displayed.
If you need help getting things working right, please let us know at support@nodeping.com.  If you don’t yet have a NodePing account, please sign up for our free 15-day trial.

Finding the Best Server Providers

Great services need great boxes to run on. How do we know if a server or VPS host is performant and reliable?

We use dozens of different hosts for NodePing and our standards for performance and reliability are really high. There are many SaaS out there that host only on AWS. Putting all your eggs in one basket is nice for billing but would make our service fragile and vendor-dependent. We spread our boxes around to make it resilient and better represent the Internet’s disperate architecture for monitoring.

We have to take new boxes out and put them through their paces; kick the tires and make sure they’re solid. This is how we test out a new provider before we use a dedicated server or VPS.

Blacklisted

As soon as we have our IP assignments from the provider, we check to make sure the IPs aren’t listed in any spam blacklists using NodePing RBL checks. Most of our hosts don’t send any actual email but our public probes do a lot of SMTP connections to ensure our customers’ mail servers are functioning properly. If the IPs are blacklisted, we’ll need a clean IP from the provider or cancel and look elsewhere.

We’ll leave this RBL check running once an hour to make sure it doesn’t get listed half way through our testing period.

Blacklisted IPs can be a good indicator of provider quality even if the server won’t be sending any email. A provider that can’t keep spammers out of their service is unlikely to be able to keep a reliable network.

Incoming Traffic

Solid networks can be hard to find. We test for inbound packet-loss and routing issues using NodePing PING checks. We’ll sometimes test from a few different geographical regions to ensure global routing is stable. Anything less than 100% uptime for 30 days is unacceptable for us. If the provider had announced planned maintenance well in advance, we’d use NodePing’s maintenance feature to ensure the uptime stats remained accurate despite planned outages. In our decade-plus experience, a network that sees even one episode of packet-loss or route failure is going to continue to see them and isn’t stable enough for our use.

We’ll do the same for IPv6 addresses as routing and packet-loss can be independent of the IPv4 stack. Some providers have a hard time keeping their IPv6 blocks broadcasted and we’ve seen IPv6 completely fail while IPv4 continued to function normally.

We enable automated diagnostics for all our PING checks so we can see where on the route the packet-loss or routing failure is happening. Getting immediate MTRs can show us the weak links in a network and if we see issues with some of the usual suspects, we will for sure dump it. Yes, I’m looking at you, Cogent!

Outbound Traffic

Sometimes a network issue seems to only impact outbound routing. We use the AGENT functionality to assign additional PING checks to originate from the server being tested towards some of the other servers it would be connecting to if it’s moved into production. The AGENT software will run NodePing checks just like the public probes but originating from our test host. It’s a great way to detect outbound packet-loss and routing issues from the server. Again, anything less than 100% uptime on this test and the service isn’t going to make muster.

System Load

The performance of a VPS can be greatly impacted by issues outside our control. Two of the most frequent system load issues we’ve seen on VPS are noisy neighbors and host server backups.

A good provider won’t oversell their VPS host servers and will suspend anyone who is abusing more than their fair share of resources. If we end up on a box with noisy neighbors, the system load on our VPS will likely spike, starving our processes from getting the CPU, memory, networking, or storage I/O they need to function properly.

We’ve also come across providers where we saw system load rise every Saturday around midnight (GMT) for 30 mins or so. Turned out their backup process was overwhelming the disks and causing load issues on all the VPS on the host.

These types of issues are simple to find using PUSH checks that monitor the system load. Since we aren’t using these boxes for anything yet, we have to set the thresholds pretty low to detect load issues caused by resource starvation. This is one test that we’ll give a bit of slack to a provider if it fails though. Noisy neighbors or hungry backups can happen to any provider and we’ll give them a chance to find and address the cause. If it keeps happening though, pull the plug on that provider. It’ll just be worse once you start using the machine and an ongoing headache trying to get their support to do anything about it.

If a server can keep humming along for 30 days without any of the checks above failing, there’s a pretty good chance that provider and network are going to be solid and reliable. I hope this look into our vetting process will help you with your provider search for those elusive reliable networks and servers.

If you don’t yet use NodePing, please sign up for our free, 15-day trial and see for yourself how our monitoring can increase your uptime.

Monitoring VPN Connections with NodePing AGENTs

In today’s world, VPNs have become more popular and widely used. Some common use cases have been road warrior VPNs when you are on the go, site-to-site VPNs for satellite offices, and remote connections back to the office for those who work from home (WFH). Since VPNs have become so central to many of our activities, it is important to ensure that the VPN setup you are using is both available and working as intended. This sort of monitoring is readily available with our AGENT feature.

The NodePing AGENT is designed to run NodePing monitors on your own private infrastructure. The AGENT allows you to run checks you want from any network, as long as you can stand up a Linux computer to run the AGENT. This includes locations we do not have a public probe, like your local networks, and even over VPN connections. Once you have an AGENT created and running, you can assign checks to the AGENT as the location, and the checks will run on the AGENT automatically. Most of our check types are available to use to monitor services and connectivity, which allows you to monitor your VPN resources without having to allow our public probes into your network. No firewall changes needed!

The AGENT can work with many different VPN setups. For example, configuring your AGENT computer or VM to be a WireGuard peer to monitor a WireGuard VPN. This works with other VPNs as well, such as monitoring OpenVPN connections or you can monitor IPSec or IKEv2 VPNs. With connectivity to your remote network, you can run your checks to ping internal servers, do local DNS queries, which can be useful if you have a split-DNS configuration, or HTTP connections to your local servers, and it can test outbound connectivity to the Internet.

To get started running the AGENT, you need to first create an AGENT check on NodePing. This can be done either by signing into your account on our website, or via the API. You can find this information in our documentation. The AGENT check creates the AGENT instance so you can assign checks to it. The AGENT software also sends a heartbeat so you can ensure the AGENT is running and doing its jobs. To create the AGENT check, follow these steps:

  1. Click “Add new check”
  2. Select AGENT from the Check type drop down
  3. Label the AGENT to identify it, adding a meaningful location to the label. This label is what will appear in the locations list when you assign checks to run on the AGENT
  4. Set the Check Frequency. 1 minute is recommended
  5. Optionally set “Fail when heartbeat is old” so you can know if the Agent is not submitting results
  6. Set notifications for the check
  7. Then save the check

Next, to run the AGENT software on your computer, install NodeJS on your Linux distribution of choice, then you can proceed with installing the AGENT. The instructions can always be found on our GitHub repository, but for now, here’s the short version as an example:

$ git clone https://github.com/NodePing/NodePing_Agent.git
$ cd NodePing_Agent
$ npm install
$ node NodePingAgent.js install 202306261809OGK26-N68DRNSR SW3UN1KW-5J6K-47SK-8QJH-SJPY9V7EC0IB

The Check ID and Checktoken in the example above are used to tie this instance of the AGENT running on your computer to the check running on NodePing. They can be found with the check information on the NodePing site:

The install command will set up the AGENT to run, and at this point you can now create checks to be assigned to this AGENT. To do that, create a check, and in the “Region” dropdown, select the name of the AGENT you just created. After creation, you should begin to see the checks running on your AGENT.

Additionally, if you want to take advantage of our Automated Diagnostics or our other Diagnostic Tools, you can start the Diagnostic Client on your computer as well:

node DiagnosticsClient.js >>log/DiagnosticsClient.log 2>&1 &

Now that you have the AGENT software running on your computer, and the AGENT check set up and connected, we can start assigning checks to run on this AGENT. In this scenario, let us assume we have an internal web server at 192.168.20.150, an internal DNS server we want to query at 192.168.20.100 and make sure it is returning 192.168.20.150 for our internal webserver FQDN internal.example.com, and lastly test to see that we can ping something on the Internet too so we know our clients can connect to the Internet through the VPN.

For the Web server, let’s set up an HTTP check to run on the AGENT

Note the “Region” dropdown and that I selected the AGENT I created earlier.

Next we want to make sure that we are getting the proper internal IP address for that web server:

Here, we configure the check to make a query to the internal DNS server 192.168.20.100 and expecting the answer 192.168.20.150 for internal.example.com.

Lastly, we want to ping an external server to see that clients can reach the Internet. This is useful if you do want your VPN clients going out to the Internet too. For this example, we would ping external.example.com (note these aren’t real websites):

This is all only one example of many ways you could configure your VPN monitoring. Our AGENT is capable of handling all sorts of different monitoring tasks you may want to throw at it.

The NodePing AGENT is a robust feature we provide as a part of our Premiere plan. If you don’t yet have a NodePing account, please sign up for our free, 15-day trial and try out our on-premises monitoring and see how our AGENT can help you with monitoring your VPN connections.

The NodePing API and PowerShell

At NodePing we interact with our own API quite a bit from the command line.  Most of that is from bash on Linux, because that’s where we live most of our lives.  But the API works well from just about any scripting environment.  Since our documentation examples all use curl with bash syntax, it seemed like it might be a good idea to also write up some examples of using other tools.  Here, as the first installment of that effort, is a handful of examples of using PowerShell with the NodePing API.

Full disclosure: PowerShell is not an environment we spend a lot of time working with.  There are likely ways to do some of this better.  We’ve tested the example calls in this post.  Hopefully it is enough to get you started if you work with PowerShell.

Basic GET Calls

Basic calls are quite simple to make using Invoke-RestMethod.  If you have the check ID, getting a check is quite easy:

Invoke-RestMethod ‘https://api.nodeping.com/api/1/checks/201205050153W2Q4C-OJ2HSIRF?token=[token]’

This returns a JSON object, which PowerShell handles easily.

_id : 201205050153W2Q4C-0J2HSIRF
description : This is the description, if the check has one.
public : False
customer_id : 201205050153W2Q4C
queue : nyI8JSL23W
interval : 1
created : 1427513104608
pro : nodeping.com
modified : 1510332098196
parameters : @{target=https://example.com/; follow=False; threshold=5; sens=2; invert=False; verify=false}
firstdown : 0
label : Keep me
runlocations : False
enable : active
uuid : bd3eha9o-z2m5-4qg2-9k8b-jqq0kiituyxz
state : 1
status : assigned
notifications : {}
type : HTTP
acctdisable : False
suspacct : False
dep : False

Note that “parameters” is another hash.  You can refer to the fields in the check as properties of the returned object, including properties that are hashes themselves.  So, for example, this will give you the check check threshold, which is part of “parameters”.

$check = Invoke-RestMethod ‘https://api.nodeping.com/api/1/checks/201205050153W2Q4C-0J2HSIRF?token=[token]’ ;
$check.parameters.threshold;

API Authentication

PowerShell doesn’t easily support basic authentication.  Since the NodePing API supports passing the token as a parameter, the easiest approach is to include it in the query string, as I did in the example above.  In most cases I prefer to pass it in the Body, as I’ll show in examples below.  If you’re working with a script its usually easiest to set a $token variable and use that throughout your script.  If you’re just sending a URL as I did in the simple GET calls above, actually putting in the query string works fine.

If you’re using the API in scripts that make several calls to the API, you might want a more reusable way to pass the token that keeps it out of your Body.  You can do this by manually building the headers.  That requires base64 encoding the credentials and then setting that using the -Headers argument. That looks something like this:

$hash = [Convert]::ToBase64String([Text.Encoding]::ASCII.GetBytes(("{0}:{1}" -f $token,"")))

Then set the -Header argument to @{Authorization=(“Basic {0}” -f $hash)}

Or, if you are doing this several times, you will probably want to set this to a variable you can reuse.

Some sites suggest that you create a credential object using ConvertTo-SecureString and Management.Automation.PSCredential, and pass that using the -Credential argument.  However, this won’t work with the NodePing API, since the -Credential option waits for the challenge to send the authorization header.  The API is stateless, and expects the header on each request.

Put and Post Calls

We recommend that you use JSON to set fields for our API in most environments.  However, PowerShell does not automatically handle sending the body as JSON.  For POST calls, this isn’t a big deal, and you can just POST the body as it is and Invoke-RestMethod sends the data as if it were a form.  PUT and DELETE calls don’t work that way.  For those, you have to convert to JSON, or include all of your parameters in a query string.

Creating a check looks like this:

Invoke-RestMethod 'https://api.nodeping.com/api/1/checks' -Method Post -Body @{ 
    label='test label' 
    type="HTTP"
    target="http://example.com"
    token=$token 
}

This call will return an object with the new check.  You can add any of the other fields listed in our documentation.

Updating a check is almost the same.  This can all be done on one line, but we’ll split it out here to make it easier to see.

$data = @{ label='a new label'; type="HTTP"; interval=5; token=$token } | ConvertTo-Json
Invoke-RestMethod 'https://api.nodeping.com/api/1/checks/201205050153W2Q4C-0J2HSIRF' -Method Put -Body $data

Note that since we’re updating a check, we need to include the check ID.  As with the Post call, the Put call returns the updated check object.

Working with Lists of Checks

Working with a list of checks is slightly trickier.  The call returns a JSON object with a list of checks using the ID as the key.  For PowerShell, this is a hash table of hashes.  So to list checks, you would do something like this:

Invoke-RestMethod 'https://api.nodeping.com/api/1/checks' -Body @{ token=$token } | %{ $_.PSOBJECT.Properties.value }

This is actually fairly handy, because you can fairly easily list a specific field from the response.  For example, this lists all of the targets from all of the checks on this account:

Invoke-RestMethod 'https://api.nodeping.com/api/1/checks' -Body @{ token=$token } | %{ $_.PSOBJECT.Properties.value.parameters.target }

You could do all sorts of things at this point.  For example, here’s a list of all checks that include “nodeping” somewhere in the check’s target:

Invoke-RestMethod 'https://api.nodeping.com/api/1/checks' -Method Get -Body @{ token=$token } | %{ foreach($value in $_.PSOBJECT.Properties.value){ if($value.parameters.target -like "*nodeping*"){ $value } } }

This is practical as a way to find a check with a specific target up to a few thousand checks.

Getting Results

Applying the same principles should let you do just about anything with the NodePing API.  Applying the same pattern to a results call, for example:

Invoke-RestMethod 'https://api.nodeping.com/api/1/results/201205050153W2Q4C-0J2HSIRF' -Method Get -Body @{ token=$token; limit=2; clean=1 }

Note that you’ll want to always include the “clean” parameter for results.  The unclean response takes more parsing.

The options available for results calls are documented here:
https://nodeping.com/docs-api-results.html

Profit!

That’s the basics of using PowerShell to interact with the NodePing API.  With the API you can add checks, remove checks, get your results and uptime, manage contacts and notifications, and add and manage subaccounts.  Our customers use the API both for programmed integrations, and from the command line using quick scripts like the ones I demonstrated here to make quick changes to several (or lots) of checks at once.

If you’re doing interesting things with PowerShell and the NodePing API, we’d like to hear about it!  Please email support and let us know.  That’s also a great place to ask us questions.  We’re happy to help people interact with our service.

Support for Multiple Public Status Pages

Our public status report is a critical part of keeping your customers informed of your site and service status—which after all is one of the points of monitoring. Our status pages are customizable to your company, and support a custom domain so you can display your status at status.yourdomain.com, or whatever is most applicable to your business.

We have had a public status page as one of our key features for some time.  Now, we’re adding support for multiple status pages on one account. For instance, NodePing has a status report page for our websites at status.nodeping.com, and one specifically for our probe servers at probestatus.nodeping.com.  Business and Provider accounts can optionally set up an SSL cert for their status pages (contact support for info how).

To create a new status report, just log into your account , and go to the “Account Settings” tab, then the “Reporting” subtab. Click “Add new status report” and add as many checks as you want to your new status report.  

We hope you will find this feature just as useful as we do.  We also have several more enhancements for public status pages coming soon.  Let us know what you think at support@nodeping.com, by posting comments here, or by using our Contact Page.

IPv6 Monitoring

NodePing now supports IPv6… mostly.

Our website and server monitoring service can now monitor IPv6 services. With real, honest-to-goodness ICMP pings as well as the funky bracket notation for URLs:

http://[2606:c700:4020:11::53:4a3b]/

Our IPv6 support is pretty extensive.

Even though IPv6 adoption has only just crossed the 10% mark, we know many of our customers are out in front of that pack and we’re happy to keep an eye on your v6 stuff.

If you’re using hostnames that resolve to both IPv4 and IPv6, you’ll need to set up separate checks and specify the IPv6 services using the IP as our services will continue to prefer IPv4 for resolution of hostnames. The exception here is our ping check, where you can specify the protocol version to use with a hostname.  You’ll need two checks to cover both protocols.

Unfortunately there are a few caveats and addendums… A couple of our check type don’t yet support IPv6 routing – RBL and SIP checks.  Not many RBLs (Real-time BlackLists) support IPv6 addresses and our SIP check relies on a library that doesn’t support IPv6.  We’ll keep an eye on these and add IPv6 support to them when we can.

We also aren’t able to provide IPv6 monitoring from our Latin America region, sorry.  IPv6 connectivity in Latin America is nearly non-existent currently. We’re sure that will change in the future and we’ll be able to bring that online eventually as providers there start offering it. Our other regions (North America, Europe, and East Asia/Oceania) are well supported.

IPv6 support is available on all NodePing plans. If you’ve got IPv6 services that need monitoring and don’t have a NodePing account yet, please sign up for our free 15-day free trial.  We’ve got your back.


rDNS: Monitoring the Flip Side of DNS

DNS monitoring is an important part of keeping your services available. DNS is what allows your browser to turn the name ‘nodeping.com’ into the IP address 192.95.37.22. Without proper functioning DNS, your website, email, and other services would be unreachable.

One often neglected part of DNS monitoring is the rDNS, or reverse DNS, entries. As the name suggests, rDNS is the reverse of DNS. It maps an IP address to a hostname using a special PTR DNS record type. In essence, it associates an IP address to a specific hostname or domain.

PTR records are used by all kinds of utilities and services like the humble ‘ping’ and ‘traceroute’ as well as more complex FCrDNS-enabled services. A forward-confirmed reverse DNS (FCrDNS) verification uses the PTR record to associate a domain owner with an IP address. It’s not a rock-solid form of validating ownership but is usually considered enough to be used for whitelisting servers for SMTP services because spammers usually can’t fake an rDNS record when they forge domains.

If you’re sending email from a server, you should have a proper PTR record in place that includes the domain for the ‘from’ address. This will help ensure your email from that server will not get sent to the spam bucket. A PTR, or ‘pointer’, record is usually configured by whomever owns the IP address so you often have to put in a ticket with your colocation or service provider to set or change rDNS entries.

NodePing is one of very few server monitoring services that can monitor rDNS entries. To set up a rDNS check, select ‘DNS’ from the check type and ‘PTR’ from the record type dropdown. It’s important to note that your PTR record will be in what is commonly called ‘arpa’ format. An example of the ‘arpa’ format for the IP 192.95.37.22 is ‘22.37.95.192.in-addr.arpa’ – please note how the octets are in reverse order, not the numbers. Set the ‘arpa’ address for your IP address in the ‘Query’ text field. You’ll also want to set the ‘Expected Response:’ field to the hostname for that IP, example: ‘api.nodeping.com’.

For more information about rDNS/PTR monitoring or our DNS check capabilities in general, check out our DNS check documentation.

HTTP Advanced Check

Our HTTP checks for website monitoring at NodePing already include our standard HTTP Check, the HTTP Content Check that lets you verify that specific content is present or is not present in the page, and the HTTP Parse Check that allows you to track and alert on arbitrary data points in the response. Today we’re excited to announce that we’re adding the HTTP Advanced Check to our HTTP line up.

The new HTTP Advanced Check adds the following capabilities:

  • simulate a form POST to your web site and verify the expected response
  • check for arbitrary HTTP response status codes for custom API servers
  • send HTTP headers
  • verify specific HTTP headers are being received
  • send PUT, DELETE, HEAD, TRACE, or CONNECT methods

This will allow you to do more in-depth monitoring of your HTTP services. Use cases may include:

  • POST incorrect credentials to log in pages and verify the HTTP status code of 403 is returned.
  • Send mobile browser User-Agent headers and use the content checking to verify the mobile version of your site is being shown
  • Verify a PDF link is returning a PDF file by checking the return header for the correct ‘Content-Type’:’application/pdf’
  • Verify your redirect script is returning a 302 status code and not an error.

Additional information about this new check type can be found in our documentation.

The HTTP Advanced check is now available on all NodePing accounts. All accounts also include unlimited notifications, including international SMS. If you don’t have a NodePing account yet, please sign up for our free 15-day free trial.

Sendgrid’s outage impacted our notification systems

Our notification systems use Sendgrid for email delivery. Overall, Sendgrid has been very reliable and a solid service provider. Today Sendgrid had a fairly significant outage, and that has impacted the timely delivery of some of our email notifications. Obviously for a service like ours this is a big deal.

We are in the process of reviewing our notifications infrastructure to see how our failover systems can be improved to make sure our notifications always get out in a timely fashion. Our apologies to our users who were impacted by this problem.

If you have any questions about this issue, please feel free to email us at support@nodeping.com.

Twitter Notifications

NodePing is happy to announce our newest notification method – twitter direct messages.  The ability to receive a twitter direct message is a great addition to our current notification system that already includes unlimited email, international SMS, and voice calls.

Twitter notifications are in testing at this point.  They are available on all accounts so please do kick the tires and let us know how things work for you at support@nodeping.com.

You’ll need to follow @NodePing in order to get direct message alerts.  Then add your twitter handle in your contact record and in your check’s notification section and we’ll send you a private and discrete ‘direct message’ (not an embarrassing public tweet) when that check goes down and again when it comes back up.

Let us know in the comments how this new notification type is working for you and what you’d like to see added next – instant message (IM), HTTP POST to url, carrier pigeon, etc?