The following probe server will be removed immediately:
Las Vegas, Nevada (NV) – USA (72.46.131.14 / 2605:6f80:0:d::100)
Please adjust your firewalls appropriately if you whitelist.
An always current and updated list of all the IP addresses for our probe servers can be found in the FAQ, a text file, and via DNS query, probes.nodeping.com.
The following probe server will be added to the North America region on 2024/07/09:
Dallas, Texas (TX) – USA (38.114.122.106 / 2604:86c0:4001:2::2)
Additionally, we are changing the following probe server on 2024/07/09:
Sao Paulo, Brazil (BR) – BR (54.232.120.40 / 2600:1f1e:c8d:1c11::100) will change to (148.163.220.117 / 2607:f740:1::c85)
Please adjust your firewalls appropriately if you whitelist so your checks do not fail because of the probe IP address changes.
An always current and updated list of all the IP addresses for our probe servers can be found in the FAQ, a text file, and via DNS query, probes.nodeping.com.
[UPDATE – 2024-07-09 12:40GMT-7] – IP changes complete.
Additionally, we are changing the following probe server on 2024/06/06:
New York City, New York (NY) – USA (185.43.108.84 / 2a01:6c60:1003::2e6a) will change to (169.197.141.113 / 2604:86c0:3001:10::2)
Lastly, we are also removing the following probe server from the North America region on 2024/06/06:
Dallas, Texas (TX) – USA (163.123.204.130 / 2604:fbc0:3f:0:25:90ff:fea5:555c)
Please adjust your firewalls appropriately if you whitelist so your checks do not fail because of the probe IP address changes.
An always current and updated list of all the IP addresses for our probe servers can be found in the FAQ, a text file, and via DNS query, probes.nodeping.com.
[UPDATE – 2024-06-06 14:11GMT-7] – IP changes complete.
For the first time since our launch in 2011, NodePing is rolling out a major user interface update. We’ve continually added features over the years, but now, after 13 years, we’re introducing a completely revamped UI to enhance your experience. At the same time, the UI Refresh also brings a number of often-requested feature enhancements.
Why the Change?
Aside from the obvious fact that the old one looks like it was designed in 2011, our new UI is designed to streamline your workflow and improve usability, and scale better for handle large numbers of checks more easily. That will be particularly important for our customers with thousands of checks.
While the visual design has been updated this isn’t just a visual change. We have taken advantage of the opportunity to add or enhance several features, and implement some features previously only accessible through our API.
Some New Features at a Glance:
Dark Mode: For us sysadminy-types that dwell in low light!
API Key Management: Easily manage API keys (available on plans with API access).
Audit Logging: Keep track of all activities with audit logs (Premiere plan – 60 days retention).
Check Tags: Group your checks with customizable tags.
Contact Notification Suppression: Disable messages types on a contact method level.
Location Templates: Create your own “regions” with location templates.
Data Export: Export data easily from most list types.
Improved Authentication: Use Google and Microsoft OpenID Connect, plus support for custom OIDC setups (Premiere plan).
We Want Your Feedback
Your input is crucial to us. Let us know your thoughts on performance, user experience, and functionality. And if you happen across a bug, please let us know at support@nodeping.com.
Not a NodePing User Yet?
Sign up now for a 15-day free trial—no credit card required. Experience NodePing’s powerful monitoring with our enhanced user interface.
NodePing has offered a Python library over the years to support convenient usage with our API in your Python projects. Since our current Python package, nodeping-api, was released, Python 2 has become deprecated and Python 3 has made additions. While looking at using some of those additions and the deprecation of Python 2, we decided it would be better to rewrite a whole new package with an improved design instead of improving the old one. Some improvements include:
Using dataclasses where convenient for data being submitted to the API
Consistent design across the different modules
Changed docstrings to Google Style docstrings from Sphinx style
Typing used throughout the package
Like the nodeping-api package, nodepingpy provides feature parity with the NodePing API and can do the following, and more:
List, create, update, and delete checks
Manage contacts
Manage contact groups
Manage schedules
Get check results and uptime
Get notification information
Get probe information
You can get the code from our GitHub repository or install it from PyPi via pip. Examples are provided in the README as well as useful information provided by the docstrings that will be shown by your text editor’s completion menus.
Installation
To install nodepingpy, you can use the pip package manager:
python3 -m pip install nodepingpy
Examples
Below I will provide a few code snippets to demonstrate how you can use the nodepingpy package to manage your NodePing account via our API.
Get a list of failing checks:
# -*- coding: utf-8 -*-

from pprint import pprint
from nodepingpy import checks


def main():
    """Get failing checks."""

    token = "my-secret-token"
    failing = checks.get_failing(token)

    pprint(failing)


if __name__ == "__main__":
    main()
This is only a small part of what the library can do, and the documentation is detailed to get you started on integrating NodePing into your Python project. Give it a try and see how you can improve your uptime monitoring in your Python projects. This code is free and available to download. We encourage pull requests for new features so if you make changes or have requests, feel free to share.
If you aren’t using NodePing yet, you can sign up for a free, 15-day trial and test out monitoring your services today and take advantage of our API in your own Python projects.
NodePing makes monitoring your cron jobs easy with our PUSH checks. Each time your server runs a cron job, you can also have that cron job send results to NodePing to track successes and failures. Ensuring cron jobs are running properly is crucial to reliable operations. It is good to know if the cron jobs on your servers are running as you would expect, and receive alerts when they aren’t.
PUSH checks rely on basic HTTP POST requests to NodePing, which lets you submit data to give you insights into your systems. This method provides a lot of flexibility, since PUSH checks have the option to track numeric values.
Getting Started
To get started, I need to think about the cron jobs that are important to me so I can decide which cron jobs I want to monitor. Most commonly, I like to submit results with backups that I automate. I have a variety of options with how I can integrate my cron jobs for backups with NodePing PUSH monitors. For example:
Insert the heartbeat into a script
Use NodePing’s premade PUSH clients
First, I’m going to create the check for my cron job monitor. I set a label that is easy for me to recognize, set the check type to PUSH. I have a single field I will call “backups” with min/max values of 0 and I also set the check frequency to one day, since this is a daily backup. I set my min/max values to 0 since my backup program returns an exit code of 0 on successful backup, and anything else is some sort of failure. NodePing will see the 0 and mark the check as passing, or if my backup program returns something other than 0, NodePing will mark the check as failing and send me notifications.
After creating that check, I open the check drawer so I can see my ID for the check and Checktoken. I will be using this information in my cron job.
Insert the Heartbeat Into a Script
My first option is that I can add submitting results to an already existing script. I use a program such as curl, netcat, wget, or openssl to do my HTTP POST. I can either insert the one liner at the end of my script and have it POST the same data every time, or, if the job fails, I can write my script to submit a pass or fail value, which I am doing in my backup example using ‘curl’. Below is a snippet of my backup script called do_backup.sh:
#!/usr/bin/env sh

# do backup
...

# Use backup tool's exit codes to decide success/failure
complete=$(echo $?)

curl -X POST -H "Content-Type: application/json" --data "{\"data\":{\"backups\":$complete}}" 'https://push.nodeping.com/v1?id=202306261809OGK26-3IQZJE0H&checktoken=OZS4N4G2-7A6U-4N86-8PV0-067F25B7TFHO'
In my curl command, I submitted the $complete variable’s value to NodePing. When I submit the value 0, the check is marked as passing by NodePing. However, if my backup utility exited with a code of 1, curl would submit that 1 to the NodePing PUSH check, and it would be marked as failing since I configured the check to pass only when the value is 0. This way, I will get a notification right away when a cron monitor fails or starts passes again. My cron job for my backup script runs every day at 1am:
0 1 * * * /bin/sh /usr/local/bin/do_backup.sh
If you do not wish to use curl, you can use something like netcat, wget, or openssl:
On GitHub, NodePing provides a repository with premade clients and modules to get started. NodePing currently provides POSIX shell, Python, and PowerShell client scripts. The premade client gives me the option to create my own module and export the data without having to worry about how to write the HTTP POST part. This means I can submit results, like above, by modifying an existing script to work as a PUSH module. I will create a module with the POSIX client, and modify my script to work with the client.
Configuring the Client
I visited the GitHub page to download a zip file or I can use git to fetch the code directly using the following command:
I then made a copy of the POSIX client. A convention I tend to follow is to create a folder named something like “backup_cron_job_202306261809OGK26-3IQZJE0H” where the name is the label of the PUSH check in NodePing and the check ID that is generated when the check is created.
I created the folders and copied the contents of the POSIX client with these commands:
# Use backup tool's exit codes to decide success/failure complete=$(echo $?)
echo "{\"backups\":$complete}"
The client will handle submitting this result for you. In the moduleconfig file, I removed the default contents and added backups to the file
I added my checkid and checktoken to NodePingPUSH.sh file
Lastly, I made the NodePingPUSH.sh script and my backups/backups.sh script executable. When I run the NodePingPUSH.sh script, it will run my backup, then submit a success or failure to NodePing. After making sure it worked right, I added the client to my crontab to run my backup at 1am, just as before, but using the PUSH client
I added the -l to the end of my cron job to let the client log the successes and failures locally as well.
Conclusion
There is a lot of flexibility with NodePing’s PUSH checks that allows me to monitor my cron jobs. I showed you how I can insert an HTTP POST request into my existing scripts that I run via cron, or I can use the NodePing PUSH clients (or write my own in another language if I chose). Cron job monitoring is possible with any language too, and is not limited to shell scripts. PUSH checks are a very versatile tool NodePing offers, and it can go far beyond monitoring cron jobs.
If you don’t yet have a NodePing account, feel free to try out our 15-day, free trial and get started, having the assurance that your cron jobs are running, and get notified when they are not.
In this post, I will show you how you can get NodePing webhook alerts integrated with a Matrix server. In this demonstration, I will be focusing on the matrix-synapse server and Element client, namely, Element’s hosted web client for configuring Matrix to receive NodePing alerts. Matrix comes with some SDKs that can be used to more programmatically handle events and create bots, but I want to provide an option that doesn’t take much effort to set up.
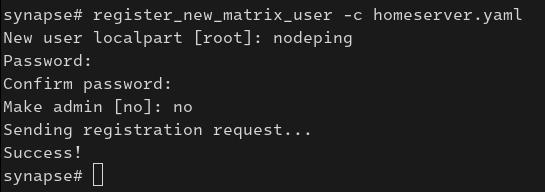
To get started, I created a new account on my home server. This account will be the one that is receiving the webhooks and sending messages to the room. Think of it as a bot, and not a user to use on the daily. I followed the instructions from the synapse documentation to create a new user. For security purposes, I run a home server with registration disabled. I chose the alternate method of running `register_new_matrix_user` to create the new user, that way I did not have to enable registration on my server.
Now that I have the new user created, I signed into Element with the account I created and proceeded to create a private room.
I made the room invite only, and left end-to-end encryption enabled, though end-to-end encryption is optional. After the room is created, I invited the users to the group that I wanted to receive the alerts.
Creating the Webhook Contact
Now that I have my notifications user in place and users invited to the room, it is time to integrate Matrix with NodePing. I need 2 pieces of information:
The room ID
The “bot” user’s access token
Getting the Room ID
The Room ID is created when the room was created. I need to go to the settings menu for that room to get the ID. First, I click on the room’s 3-dot button so I can go to settings
Then, I go to Advanced to get the Internal room ID
Next, I need to get the Access Token for my user. This is a secret token you do not want to share with anyone. However, it will be used as part of my webhook contact. I went to the quick settings menu for my user that will be sending the NodePing alerts and selected “More options”:
I went to the Help & About menu and scrolled down to the bottom to get to the Access Token section. I copied the access token out. I also made note of the Homeserver mentioned below in the Advanced section. The Homeserver, Access Token, and Room ID are going to be needed in the next step to create the webhook.
Creating the Contact
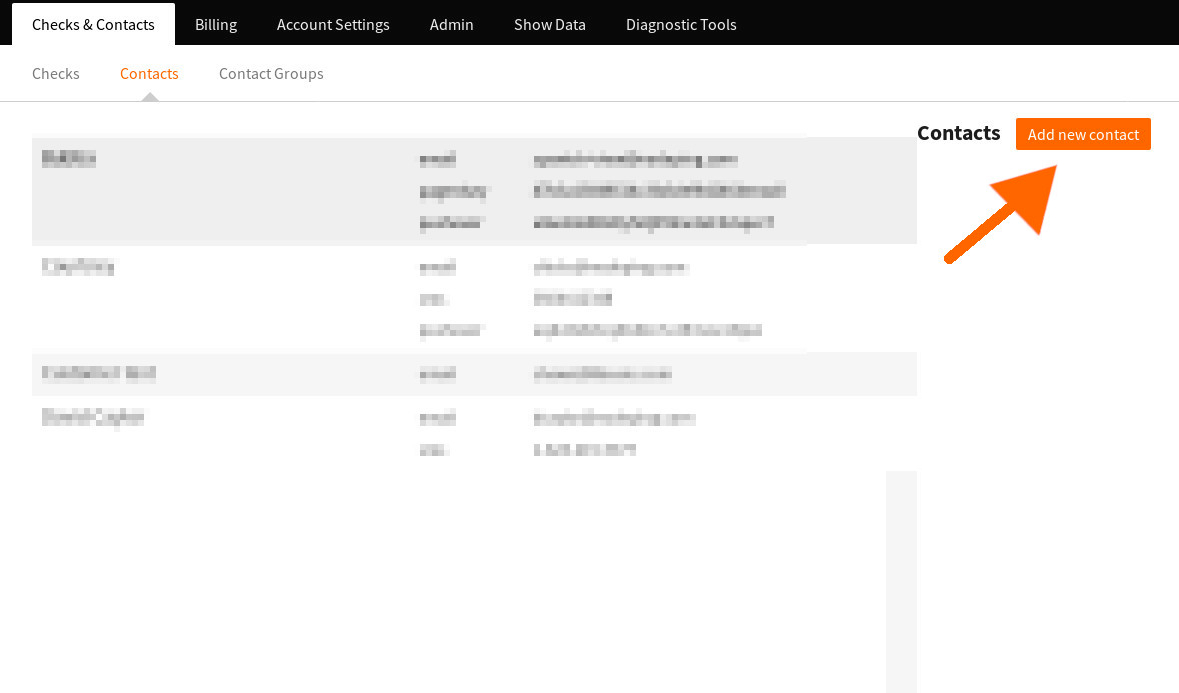
Next, I signed into my NodePing account and selected Contacts, and Add new contact:
I gave my contact a name. Then I clicked the dropdown menu and selected Webhook. That shows another dropdown for Preset Services. I chose Matrix and clicked Apply Template. The default URL should be something like:
I am not using the default https://matrix.org home server, so I changed that. However, if you are using the default home server, keep matrix.org. Next I need to replace [your encoded internal room id] with the Room ID. The Room ID needs to be URI encoded. The “!” needs to be changed to “%21” and the “:” to “%3A”, like below
Next I went to the Headers tab. There is a value with [YOUR AUTH HERE] in the Authorization header that needs to be replaced with the access token. I pasted in my access token. I kept the Body as the default. With the homeserver correctly set, the room ID in the POST URL, and the Authorization header set, I saved the check.
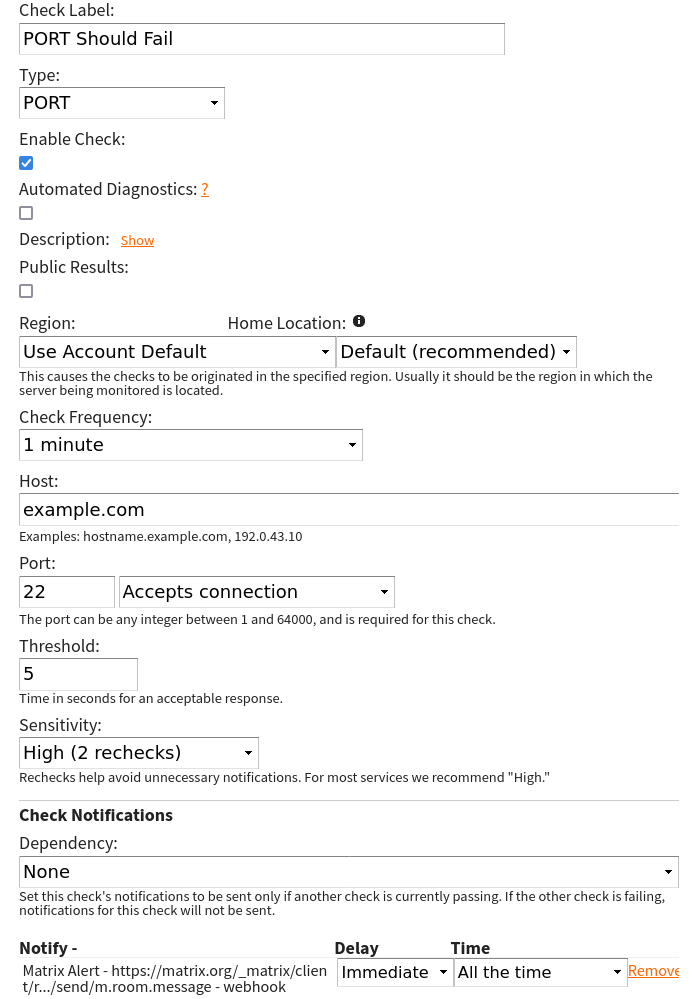
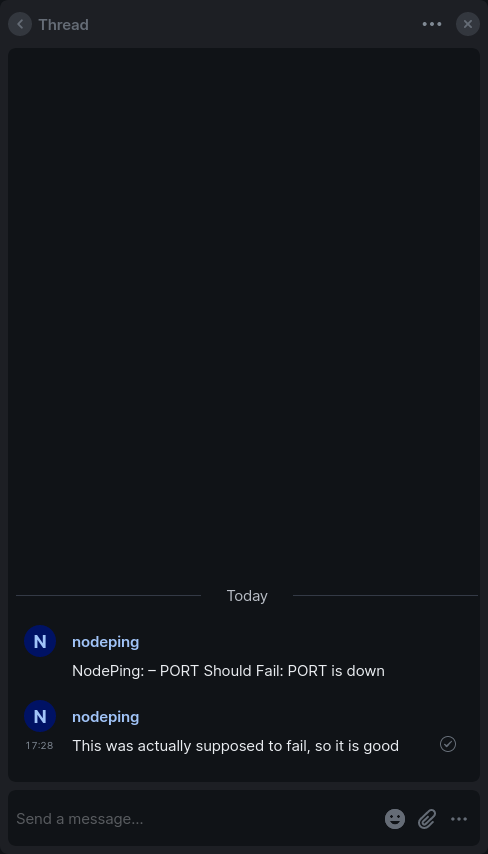
I created a check that I knew would fail intentionally and assigned the Matrix contact to the check and let it fail so I could get the alert and ensure it is working properly.
This confirms that the contact works, and now I can start assigning this contact method to my checks.
Some Useful Uses
Using with Notification Profiles
One thing I like to do is have two identical contact methods, but in one I add “IMPORTANT” to the body like below
{"body": "NodePing IMPORTANT: – {label}: {type} is {event}","msgtype": "m.text"}
This lets me do some tricks with notification schedules and notification sounds in Element. Maybe for some checks, I want to get notifications all the time, but I do not want the sound alert on my phone at certain times of the day. On my checks I have my Matrix contact that does not have “IMPORTANT” in the message send a notification all the time. However, the one that has “IMPORTANT” in the message will send on a certain schedule. In the Notifications settings on Element I created a keyword “IMPORTANT”, and then on the room I set notifications to only happen with Mentions & Keywords. That way, the messages sending all the time will not send an audible notification, but the messages with “IMPORTANT” will send me an audible notification.
Communicating About Incidents
With the Threads feature, when there is an incident, I can start a thread on that notification and communicate with the team about that incident, or I can make comments on the incident for future reference. This allows for convenient communication about an incident while not spamming the timeline where alerts are being displayed.
If you need help getting things working right, please let us know at support@nodeping.com. If you don’t yet have a NodePing account, please sign up for our free 15-day trial.
Websites that use CDN or caching services like Cloudflare or Amazon Cloudfront can be a little tricky to monitor. You need to make sure all the regular website stuff is working along with additional monitoring for the backend web server and the caching service itself.
NodePing has you covered on both ends: the regular website monitoring and some powerful features specifically for monitoring CDN websites.
The Basics
When someone wants to connect to your website, there are 4 things that have to be working correctly:
DNS
Routing
SSL
Web Server response
DNS
If your DNS servers aren’t available, your visitor’s browser won’t be able to translate the FQDN in the URL to a routable IP address so monitoring each of your nameservers is vital to website availability.
Create a DNS check for each nameserver and be sure the query for your FQDN is being answered.
Routing
Now that the browser has the IP address of a web server, it needs to be able to reach out across the interwebs and request content. Incorrect routing and packet loss can make your website unreachable.
Use our PING and MTR checks to ensure that routing is working and that there is no packet loss.
We often get questions from site owners when the monitoring says their site is failing, but they can get to it fine from their device. Upstream connectivity issues are often the reason, and having the PING or MTR check in place and running from different geographical regions can help identify those troubles quickly.
SSL
Visitors expect websites to use industry best-practices for security, including transport encryption using TLS/SSL. You don’t want them to see that embarrassing “Unsafe” warning when they hit your website because your SSL certs are expired or incorrectly configured.
Create an SSL check to warn you before the cert expires.
Web Server Response
If everything mentioned above is firing on all cylinders, the web server will respond to the visitor’s request and reply with the expected content.
Using NodePing HTTP Content checks, you can verify that the web server is returning the expected HTTP response code and content.
With the basics of website monitoring nailed down, there’s a couple of additional challenges that caching services create that need special monitoring.
Monitor the Back-end Server
If your back-end server isn’t functioning, your CDN or caching service will continue to respond normally, at least for a while. But you’ll want to know right away if that back-end server is offline. You won’t be able to monitor that back-end server using the regular FQDN in the URL because it points to the caching service, not your back-end server.
NodePing can monitor a back-end server using an IP in the URL. The IP address can be either an IPv4 or an IPv6 address.
Note: When using IPv6, use square brackets around the IPv6 address.
To get the SSL to respond properly, use an HTTP Advanced check and send a special request header of “Hostname” set to the FQDN of the website.
Example: “Hostname” “example.com”
Cache-busting
To make sure the caching service or CDN is able to communicate properly with your back-end server, you need to send an HTTP request to the service with a URL it hasn’t cached. That will force the service to talk with your back-end server to get fresh content. To do that, it has to be a different URL each time it’s monitored. This is called cache-busting.
NodePing has a cool cache-busting feature on the HTTP Advanced check that will slightly change the URL each time it monitors so that it always causes the caching service to talk with your back-end server.
To use cache-busting, modify the URL query string. Add a non-essential element with the value of “{{now}}”. NodePing will replace that value with a millisecond timestamp each time the check is run.
Since each URL is unique each time, there will be no cached entry and the caching service will hit your back-end server on each check run. If the service isn’t able to reach your back-end server, it should return a 522 error or something similar, which will make the NodePing check fail and alert you to the issue.
Website Monitoring
Using a CDN or caching service with your website can speed things up but it can also make things break in ways that basic website monitoring may miss. NodePing’s features allow you to ensure that your back-end web server is up and running and that your caching service is operating as expected.
If you don’t yet have a NodePing account, please avail yourself to our 15-day, free trial. You’ll see why those who know, use NodePing.
In our recent post ‘Beyond “Is It Up?” – Website Monitoring should be Comprehensive‘ we talked about how website monitoring should be wider than just measuring if a website responds to requests. If you are responsible for website availability or performance you should of course be monitoring if the website responds in a timely manner, but you also should be monitoring status codes in the response, validating certificates and domain expiration, and DNS. In today’s post I wanted to extend that discussion to another critical component of your infrastructure: monitoring database accessibility and performance. Not only are databases a critical part of your web infrastructure, NodePing’s database monitoring can be a key element in your overall infrastructure monitoring that goes well beyond the web.
Monitoring Database Connectivity and Accessibility
As with any server monitoring, the first layer to consider is connectivity and accessibility. Depending on your network infrastructure, this might mean some combination of PING, MTR, and PORT checks. These check types can tell you if the database is accessible from places it should be, and make sure it remains inaccessible when it shouldn’t be. In fact, it is a good idea to monitor your firewalls and routers with these check types. At its most basic level, the PORT check tells us if your database servers are listening and responding on the expected ports. The flip side of this is also important. If your database should not be accessible from the Internet, running a check that monitors that can be just as important to make sure it stays that way.
In testing connectivity, the PORT check can test just about any service. For databases specifically, NodePing adds protocol aware monitoring for databases that respond to HTTP requests, as well as check types that understand the specifics of connecting to Redis, MySQL, PostgreSQL, and MongoDb databases.
Querying HTTP based databases with advanced HTTP check types
For databases with native HTTP support, using NodePing’s HTTP based check types can be really useful for monitoring the database performance, as well as monitoring specific responses. For example, internally we have used our own monitoring to keep track of CouchDB databases for years. This is useful for answering questions like
Is the database responding in a reasonable time frame?
Is the database accessible using SSL/TLS, and is the certificate valid or about to expire?
Is the database listening and accessible to non-encrypted ports? In our use case, this answer needs to be “No,” so NodePing’s capability to monitor that a port is not accessible is important here.
Are Couchdb views responding? We keep some indexes that don’t get constant use warm with monitoring checks.
Are the actual values returned within expected ranges? NodePing’s HTTP Parse check can make an HTTP request and then monitor specific fields within a JSON response to make sure it is within the expected range. This is particularly useful in monitoring a Couch view that uses reduce.
Running Queries on MySQL, PostgreSQL, and MongoDb
NodePing has specialized check types that can monitor MySQL, PostgreSQL, and MongoDB specifically. For these databases, NodePing’s monitoring can run a user-defined query and report on the response. This allows you to run a custom query to track performance metrics, data counts, or set up alerts based on whether the responses are within a defined range. If the expected response is a string, you can use regex to match the response to ensure it is what is expected. These responses can be used to trigger notifications, graph values in your database, and store the data for future reference and analytics.
Security considerations for database monitoring
We already mentioned a few of the considerations around the security implications of database monitoring. The database queries discussed above can use authentication where applicable. For HTTP connections, as well as MySQL and PostgreSQL, the checks can be used to verify the encryption and certificates. But a key element in monitoring databases is that in the vast majority of cases the databases should not be universally accessible. NodePing’s AGENT based checks allow you to run these checks from your own networks, which means you get the full robust monitoring of NodePing’s checks, without opening your database ports to the outside world. In addition, our PUSH check type allows you to script database verification and push the results into NodePing for alerts and reporting. This suite of check types and options together allow you to do robust monitoring for your databases without compromising your security. In addition, we recommend that you use authentication to provide the monitoring with the least required access to do the necessary monitoring.
Monitoring Should be Comprehensive
From the outset NodePing has sought to provide website and server monitoring at a price point that allows you to run all the checks you need cost-effectively. That’s because we believe that monitoring should be comprehensive. You should be monitoring all of the components of your infrastructure in a way that when you are notified, you know immediately where a sysadmin response is needed. Database monitoring is a critical component of this. NodePing’s database monitoring can be a key part of your overall solution to ensure your services are all working as they should, and quickly tell you where the problem is in order to minimize disruptions.
Give it a try! NodePing has a free, 15-day trial, so there is no risk to trying it out. We think you’ll be impressed by how easy it is to get comprehensive monitoring in place, including for your databases, and how cost-effective and timesaving it can be as a part of your overall infrastructure management.
In Part 2, I configured my Raspberry Pi to monitor temperature, humidity, and pressure with the Sense Hat. When I encountered issues with the Sense Hat needing weird tricks to properly measure temperature, I looked for alternative sensors. I found the DHT22/AM2302 sensors on Amazon to try out. I’ve noticed with some of these DHT22 sensors that you need to add an extra resistor along the way to the Pi’s GPIO pins. I like this one in particular because the resistor is integrated already. I grabbed my Pi from my server room and took it back home to configure it.
The DHT22 Sensor
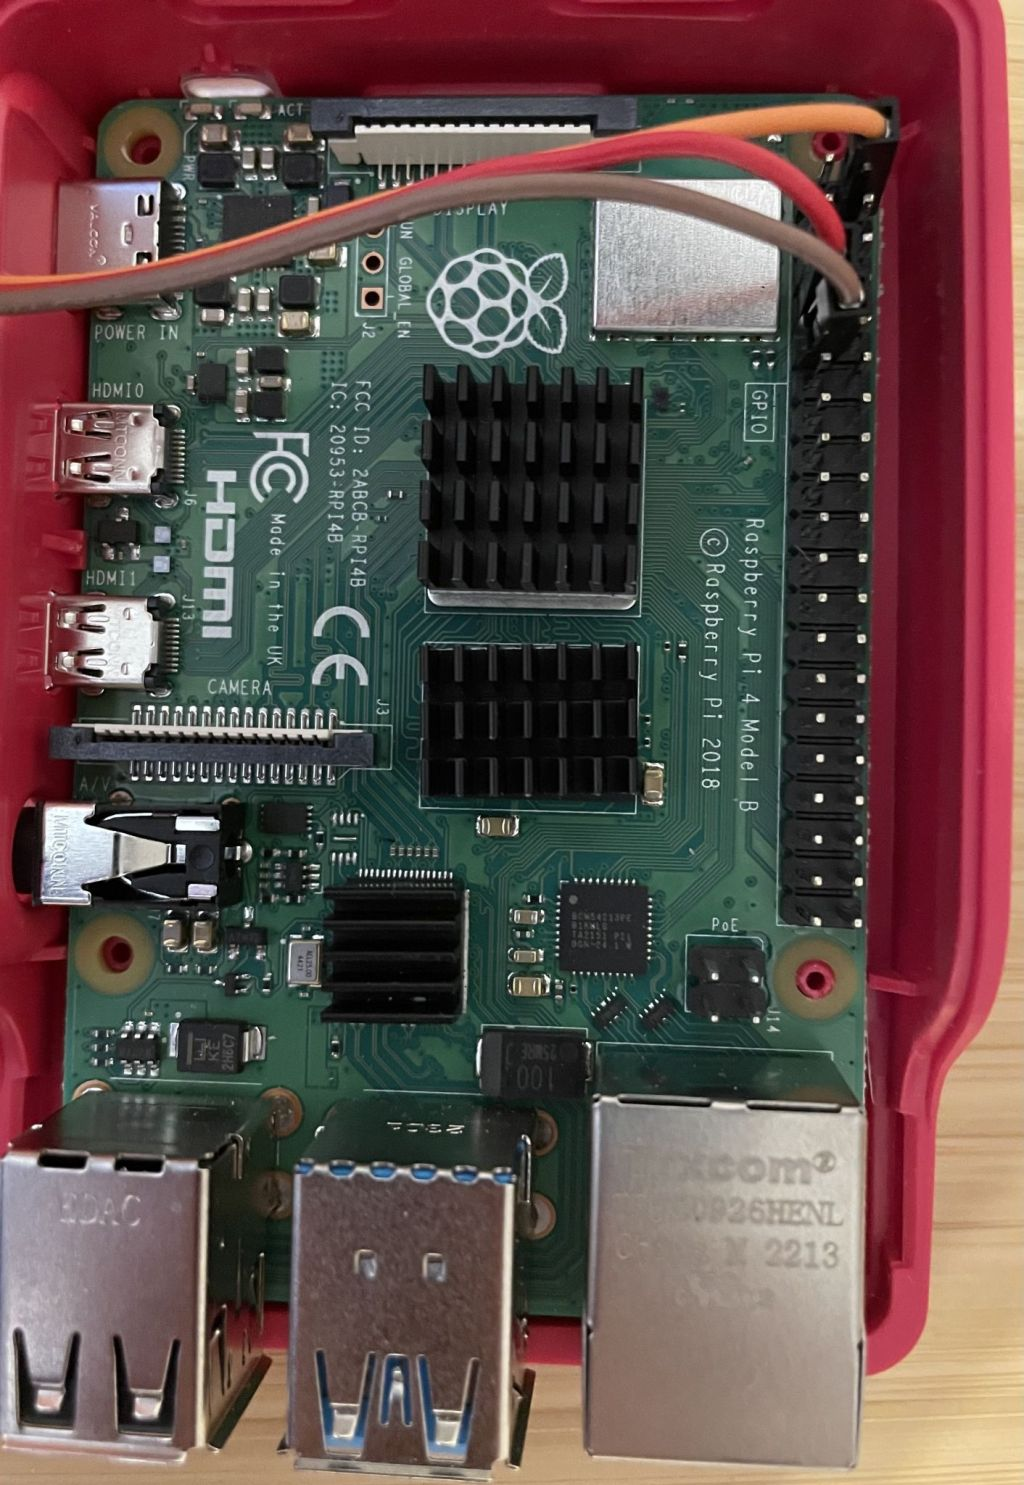
I won’t go much into detail on this sensor, but I found that compared to the other common DHT11 sensor, this one is most ideal because it has better accuracy and can be had for a similar price. So, I went with the DHT22 sensor. My package contained 2 DHT22 sensors, and six different colored cables. I wound up with orange, red, and brown cables. I connected the orange cable to power, red to data, and brown to ground. Below you can see how I connected the sensor to my Pi’s pinout. When looking at Raspberry Pi’s documentation, I connected orange to pin 2 (5V), red to pin 7 (GPIO 4), and brown to 9 (ground). If you intend on connecting the sensor to different GPIO pins, there will be some tweaking of the module needed on your part later.
The Software
I needed to install only a single piece of software to get this to work, in addition to a Python library. The software and Adafruit’s DHT Python library which I installed this way:
As in Part 2, I had to add my user to some groups to get my module working so I could collect temperatures and humidity:
$ usermod -aG video input gpio i2c pi
Creating the PUSH Check
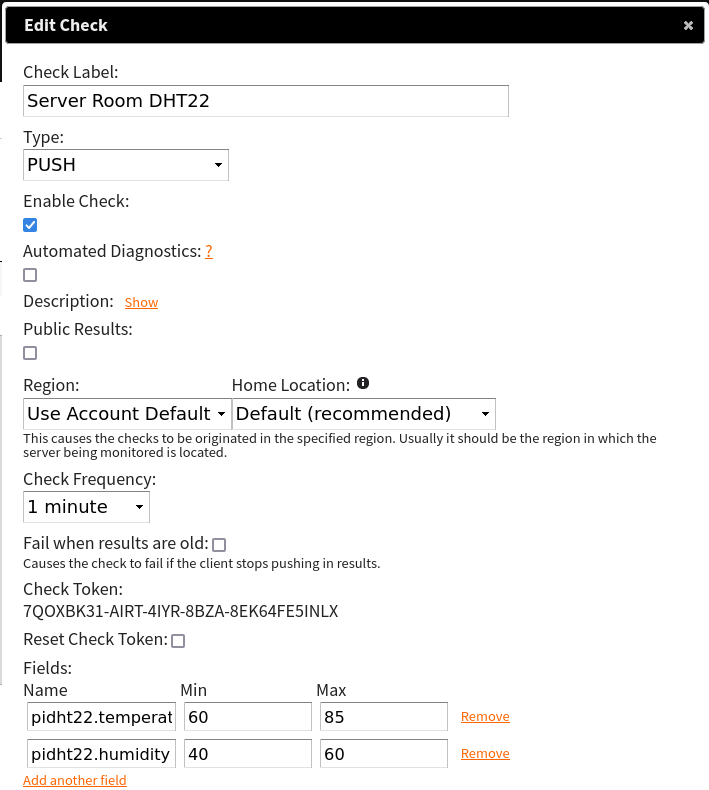
Before I can start submitting metrics to NodePing, I first need to create the check for me to submit results to. The check looks like this:
Below in the Fields section, the names should be:
pidht22.temperature
pidht22.humidity
Adjust the min/max values accordingly to what you consider a safe temperature and humidity. NodePing provides a DHT22 module for PUSH checks to work with the Raspberry Pi called “pidht22”. Since the DHT22 sensor does not have a neat LED array like the Sense Hat I used, it will only submit values to NodePing, and not do any of the cool LED displaying of information. If that is something you want, I suggest following our Part 2 guide with the Sense Hat.
Configuring the Client
Now that the check is created, I moved on to installing the PUSH client software on the Pi. To get the PUSH clients code, I can visit the GitHub page to download a zip file or I can use git to fetch the code directly using the following command:
From here, I made a copy of the Python3 client. A convention I tend to follow is to create a folder named something like “server_room_dht22-202306261809OGK26-QLJGGVM1” where name is the label of the PUSH check in NodePing, and the check ID that is generated when you create that check in the NodePing web interface.
You can call your folder whatever you want. I use this so I can easily find the right PUSH check in NodePing that corresponds to this PUSH client.
I will be using the pidht22 module to monitor my server room environment.
I copied the Python3 client code into the directory I made and cd’3d into that directory for easier editing:
$ cp -r PUSH_Clients/Python3/NodePingPython3PUSH/* push-clients/server_room_dht22-202306261809OGK26-QLJGGVM1/
$ cd push-clients/server_room_dht22-202306261809OGK26-QLJGGVM1/
To make the PUSH check work, I have to edit 2 files:
config.ini
metrics/pidht22/config.py
At the end of config.ini, there is a modules section. It should contain this information:
[modules]
pidht22 = yes
You also want to include your check ID and checktoken in the server section:
Next is the config.py file for the module. This file has two variables:
UNIT – set to “F” for Fahrenheit or “C” for Celsius
PIN – The GPIO pin to use for data (if you follow this guide and connect to the same pins I did, you don’t have to change this variable)
The client should be configured now. I will now test it by running:
python3 NodePingPythonPUSH.py --showdata
This will let me see the data that would be sent to NodePing without actually sending it. This is just for testing and is a good way to make sure I edited those files correctly without impacting any uptime stats for the check in NodePing.
Lastly, I need to set up cron to run my PUSH client on a regular interval. I want this one to run every minute, so the cron line will look like the one below. To edit my cron tab, I run crontab -e and add the following entry:
Now my check is running every minute and submitting my server room climate info to NodePing. This will allow me to track temperatures and humidity in the server room and notify me if the room is too hot/cold, humid/dry.
Ready to Roll
With the new sensor tested and running properly with NodePing’s PUSH checks, I gave it some days to trial run at home before I brought it back to my networking room to monitor temperatures and humidity.
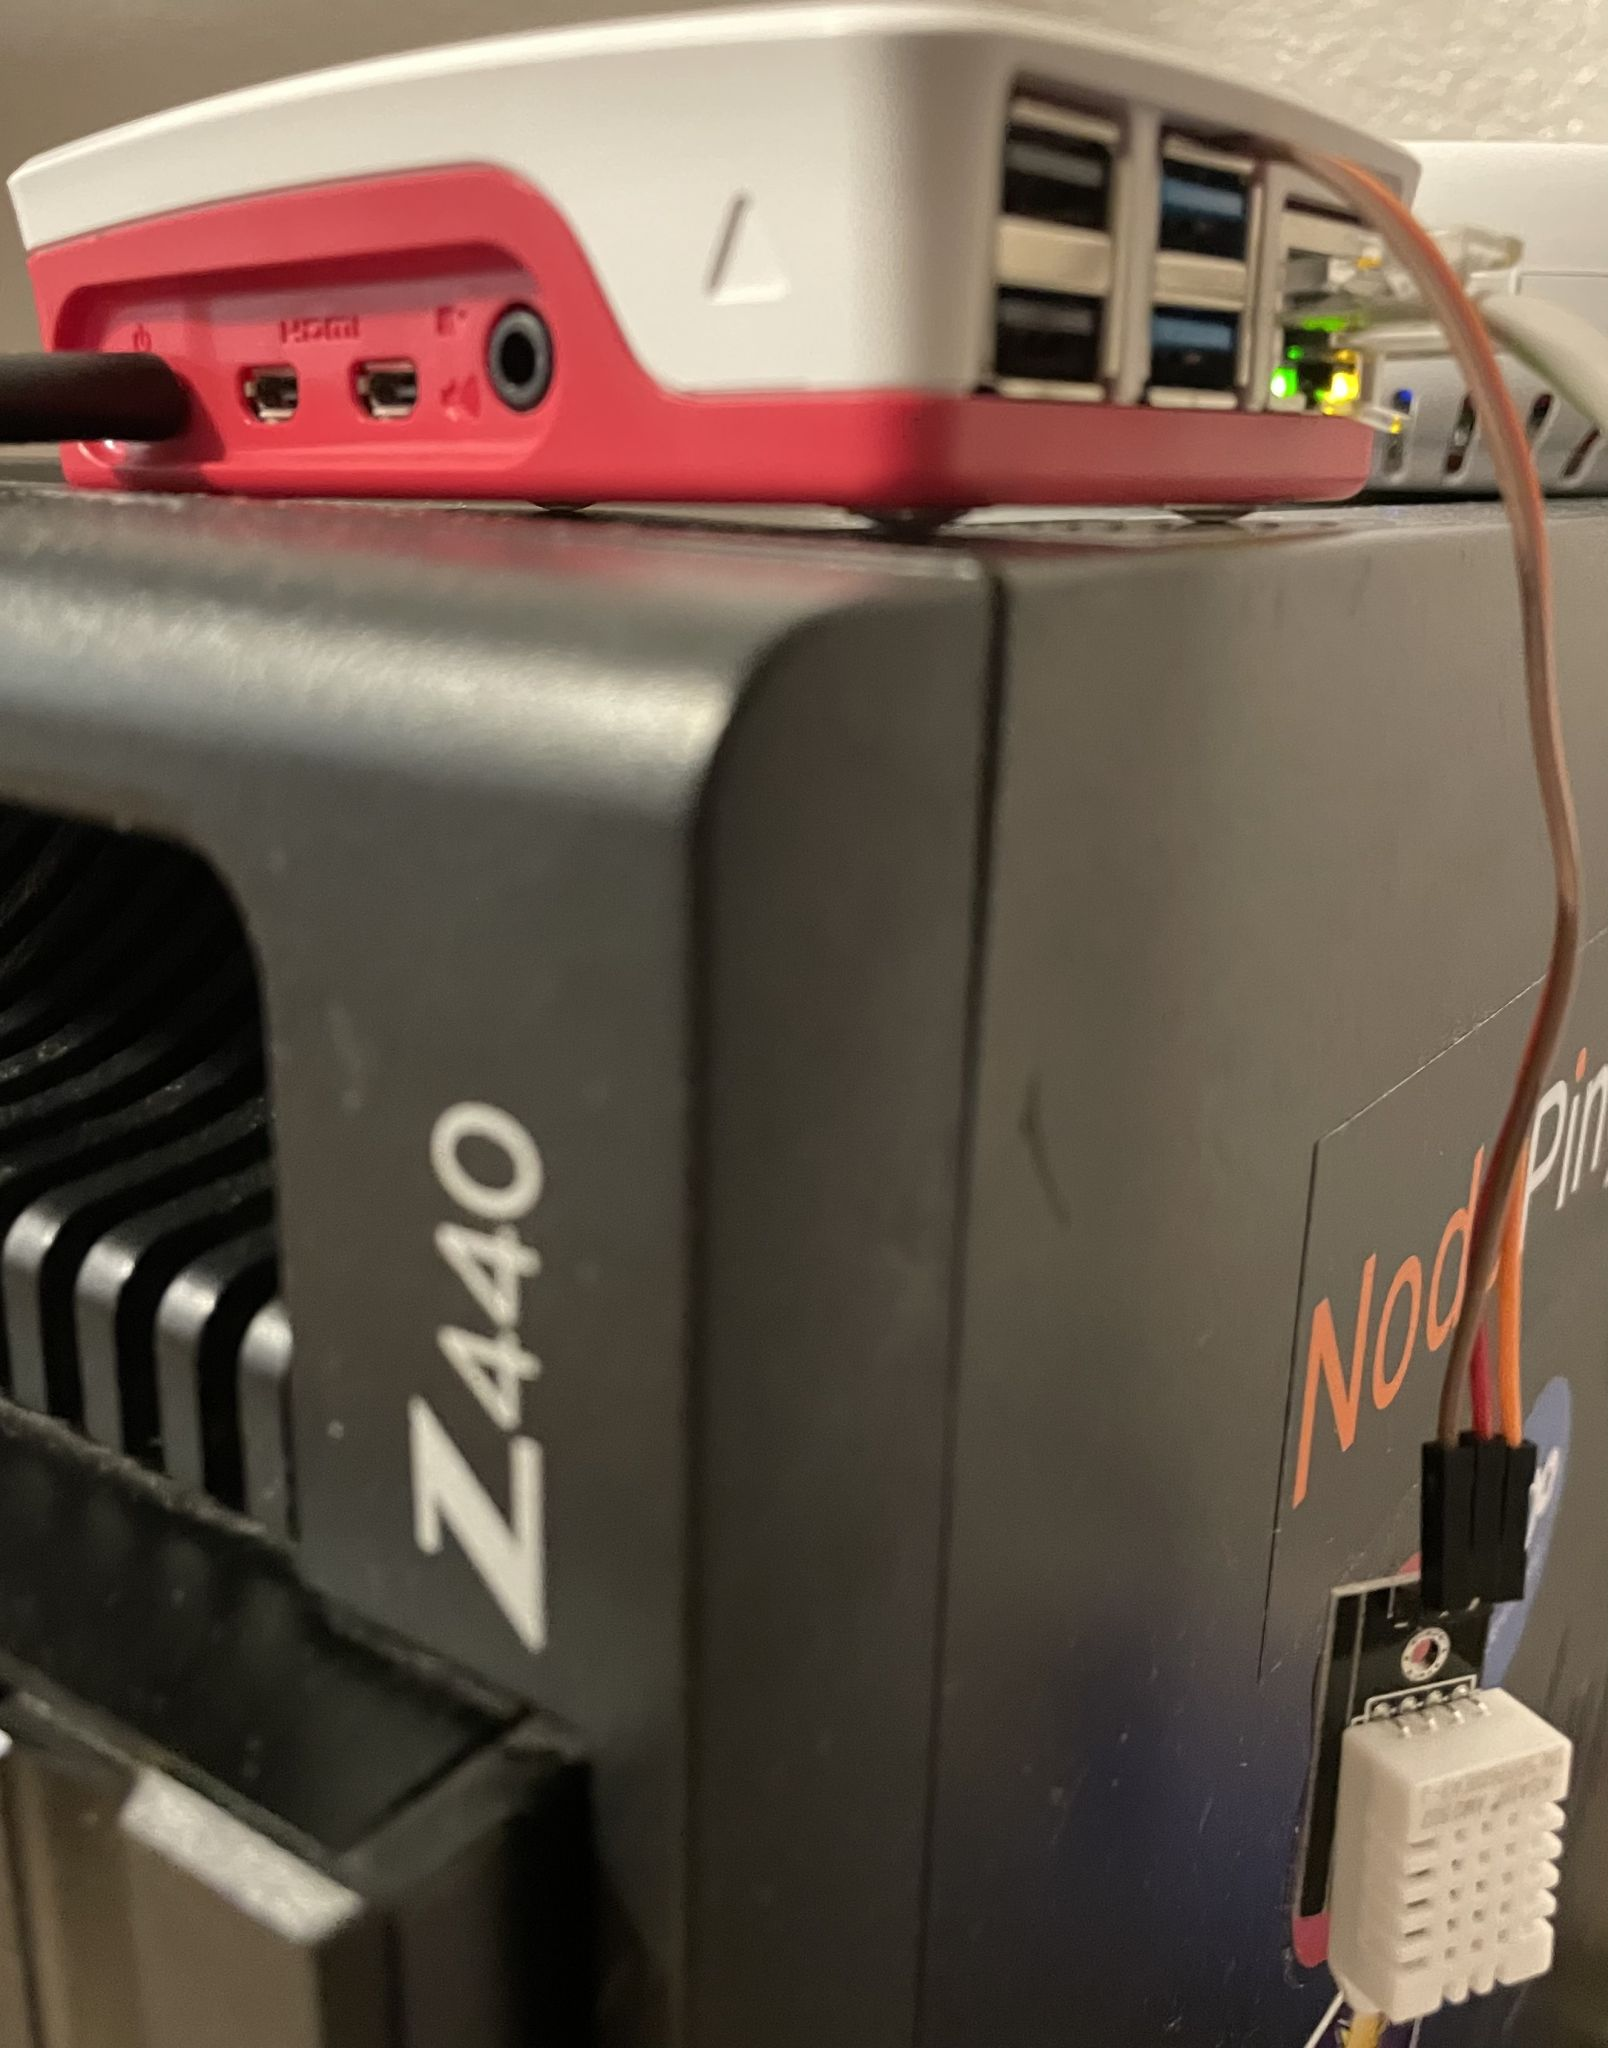
Testing atop the home server
One thing I have noticed with this DHT22 sensor is how steady temperature reporting is. Since I had to calibrate my check for the Sense Hat to account for CPU temperatures, the temperatures were always within +/- 3 degrees of the actual temperature. With this DHT22 sensor, since I have the sensor away from the Pi, the temperature reporting is more steady and makes for cleaner looking results. You can even see from the graph where the humidity dropped when I opened my window, as well as when I had stopped submitting results during testing.
Conclusion
In the end, I found the DHT22 sensor to be a better choice for temperature monitoring . The price is lower and the results are more reliable, and I don’t have to worry about the processor on the Pi messing with the sensor. Additionally, I can use any case I choose and have access to the rest of the GPIO pins if I choose to add more to the Pi.
If you find this to be useful to you and want to try this configuration for yourself you can find all the code needed on the NodePing github. If you don’t yet have a NodePing account, please sign up for our free, 15-day trial.
NodePing is an Internet web site and server monitoring service at an amazing price, allowing you to check all your website and servers as frequently as every minute, for as little as $10 a month. Our low prices include unlimited international SMS, slack, and email notifications. The 'Premiere' plan also includes unlimited voice notifications.