Monitoring the Server Room with NodePing – Part 3: Temperatures
2023/09/19 Leave a comment
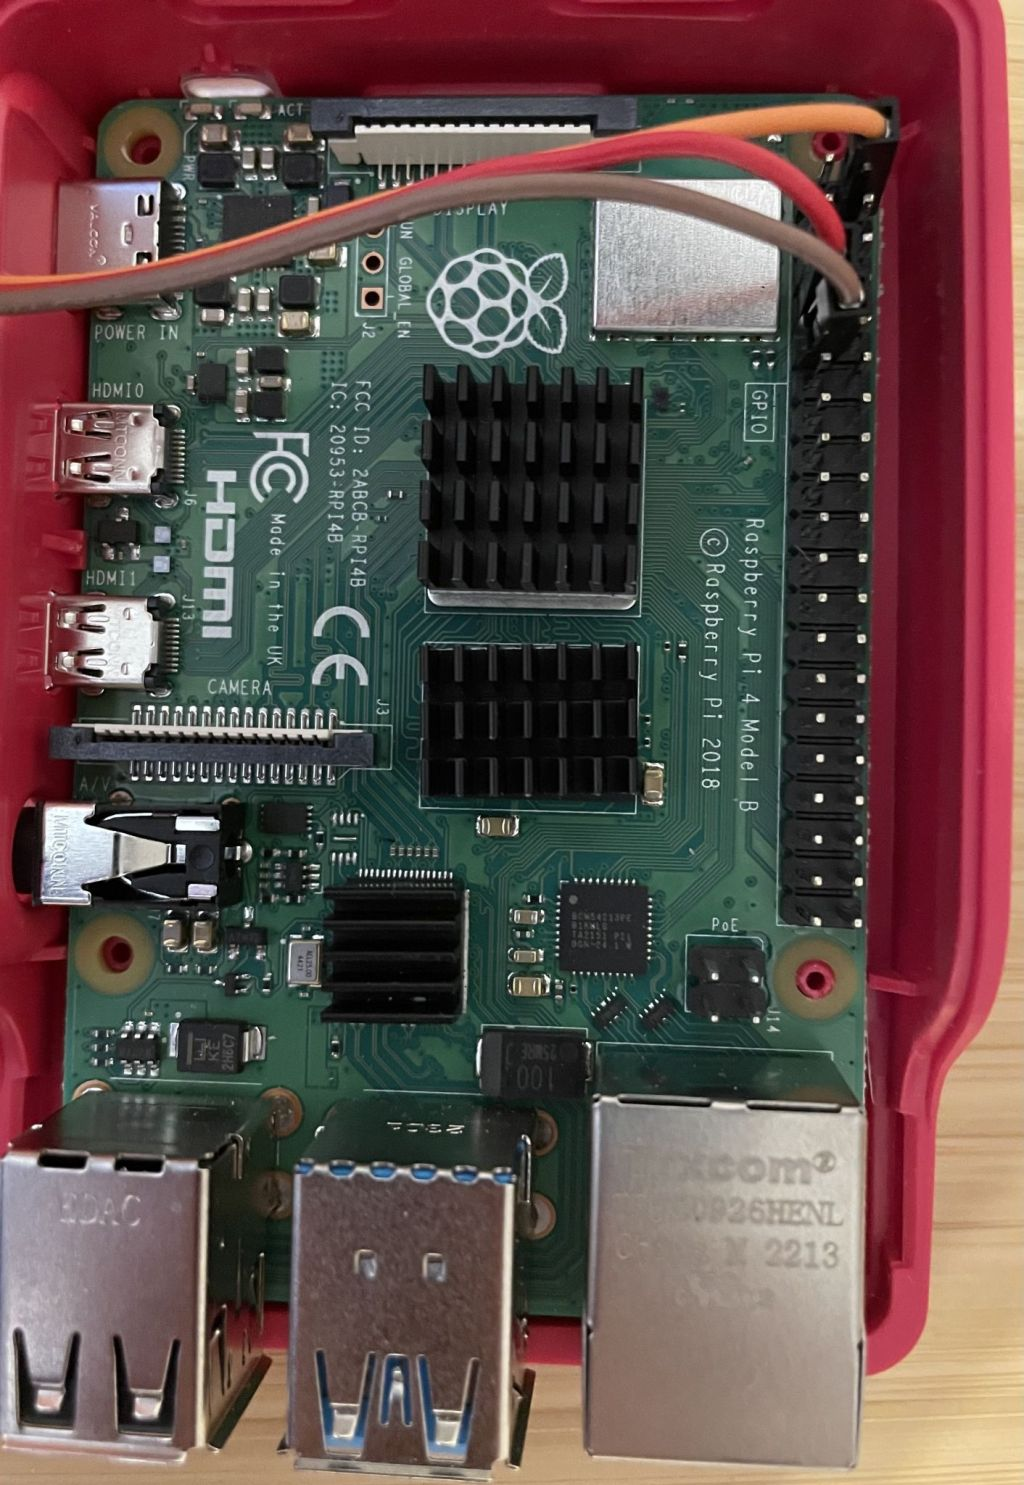
In Part 2, I configured my Raspberry Pi to monitor temperature, humidity, and pressure with the Sense Hat. When I encountered issues with the Sense Hat needing weird tricks to properly measure temperature, I looked for alternative sensors. I found the DHT22/AM2302 sensors on Amazon to try out. I’ve noticed with some of these DHT22 sensors that you need to add an extra resistor along the way to the Pi’s GPIO pins. I like this one in particular because the resistor is integrated already. I grabbed my Pi from my server room and took it back home to configure it.
The DHT22 Sensor
I won’t go much into detail on this sensor, but I found that compared to the other common DHT11 sensor, this one is most ideal because it has better accuracy and can be had for a similar price. So, I went with the DHT22 sensor. My package contained 2 DHT22 sensors, and six different colored cables. I wound up with orange, red, and brown cables. I connected the orange cable to power, red to data, and brown to ground. Below you can see how I connected the sensor to my Pi’s pinout. When looking at Raspberry Pi’s documentation, I connected orange to pin 2 (5V), red to pin 7 (GPIO 4), and brown to 9 (ground). If you intend on connecting the sensor to different GPIO pins, there will be some tweaking of the module needed on your part later.

The Software
I needed to install only a single piece of software to get this to work, in addition to a Python library. The software and Adafruit’s DHT Python library which I installed this way:
python3 -m pip install adafruit-circuitpython-dht
sudo apt-get install libgpiod2
User Setup
As in Part 2, I had to add my user to some groups to get my module working so I could collect temperatures and humidity:
$ usermod -aG video input gpio i2c piCreating the PUSH Check
Before I can start submitting metrics to NodePing, I first need to create the check for me to submit results to. The check looks like this:
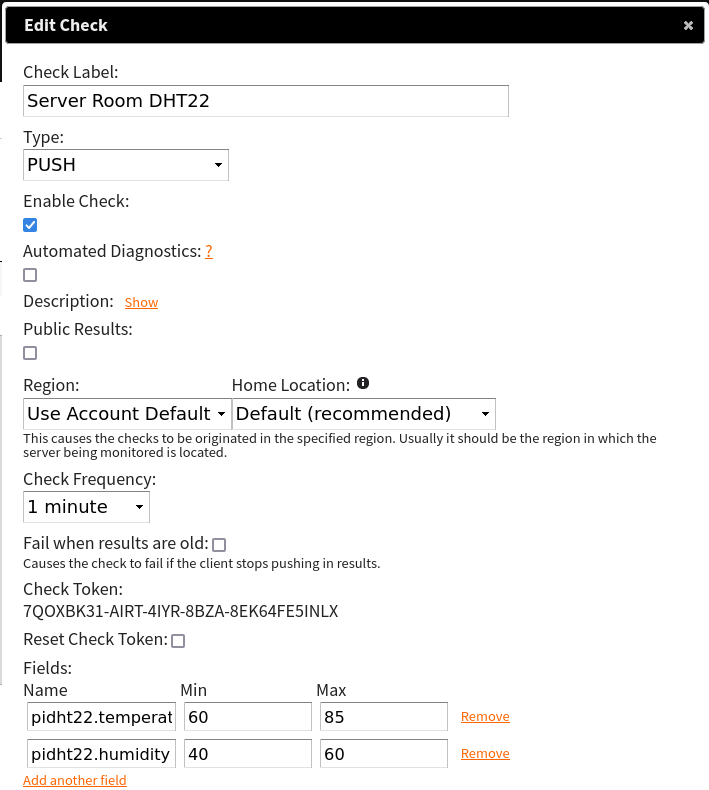
Below in the Fields section, the names should be:
- pidht22.temperature
- pidht22.humidity
Adjust the min/max values accordingly to what you consider a safe temperature and humidity. NodePing provides a DHT22 module for PUSH checks to work with the Raspberry Pi called “pidht22”. Since the DHT22 sensor does not have a neat LED array like the Sense Hat I used, it will only submit values to NodePing, and not do any of the cool LED displaying of information. If that is something you want, I suggest following our Part 2 guide with the Sense Hat.
Configuring the Client
Now that the check is created, I moved on to installing the PUSH client software on the Pi. To get the PUSH clients code, I can visit the GitHub page to download a zip file or I can use git to fetch the code directly using the following command:
$ git clone https://github.com/NodePing/PUSH_Clients.gitFrom here, I made a copy of the Python3 client. A convention I tend to follow is to create a folder named something like “server_room_dht22-202306261809OGK26-QLJGGVM1” where name is the label of the PUSH check in NodePing, and the check ID that is generated when you create that check in the NodePing web interface.
I created those folders using the command:
$ mkdir -p push-clients/dht22PUSH-202306261809OGK26-QLJGGVM1

You can call your folder whatever you want. I use this so I can easily find the right PUSH check in NodePing that corresponds to this PUSH client.
I will be using the pidht22 module to monitor my server room environment.
I copied the Python3 client code into the directory I made and cd’3d into that directory for easier editing:
$ cp -r PUSH_Clients/Python3/NodePingPython3PUSH/* push-clients/server_room_dht22-202306261809OGK26-QLJGGVM1/
$ cd push-clients/server_room_dht22-202306261809OGK26-QLJGGVM1/
To make the PUSH check work, I have to edit 2 files:
- config.ini
- metrics/pidht22/config.py
At the end of config.ini, there is a modules section. It should contain this information:
[modules]
pidht22 = yes
You also want to include your check ID and checktoken in the server section:

Next is the config.py file for the module. This file has two variables:
UNIT– set to “F” for Fahrenheit or “C” for CelsiusPIN– The GPIO pin to use for data (if you follow this guide and connect to the same pins I did, you don’t have to change this variable)
The client should be configured now. I will now test it by running:
python3 NodePingPythonPUSH.py --showdata
This will let me see the data that would be sent to NodePing without actually sending it. This is just for testing and is a good way to make sure I edited those files correctly without impacting any uptime stats for the check in NodePing.
Lastly, I need to set up cron to run my PUSH client on a regular interval. I want this one to run every minute, so the cron line will look like the one below. To edit my cron tab, I run crontab -e and add the following entry:
* * * * * python3 /home/pi/push-clients/server_room_dht22-202306261809OGK26-QLJGGVM1/NodePingPythonPUSH.pyNow my check is running every minute and submitting my server room climate info to NodePing. This will allow me to track temperatures and humidity in the server room and notify me if the room is too hot/cold, humid/dry.
Ready to Roll
With the new sensor tested and running properly with NodePing’s PUSH checks, I gave it some days to trial run at home before I brought it back to my networking room to monitor temperatures and humidity.
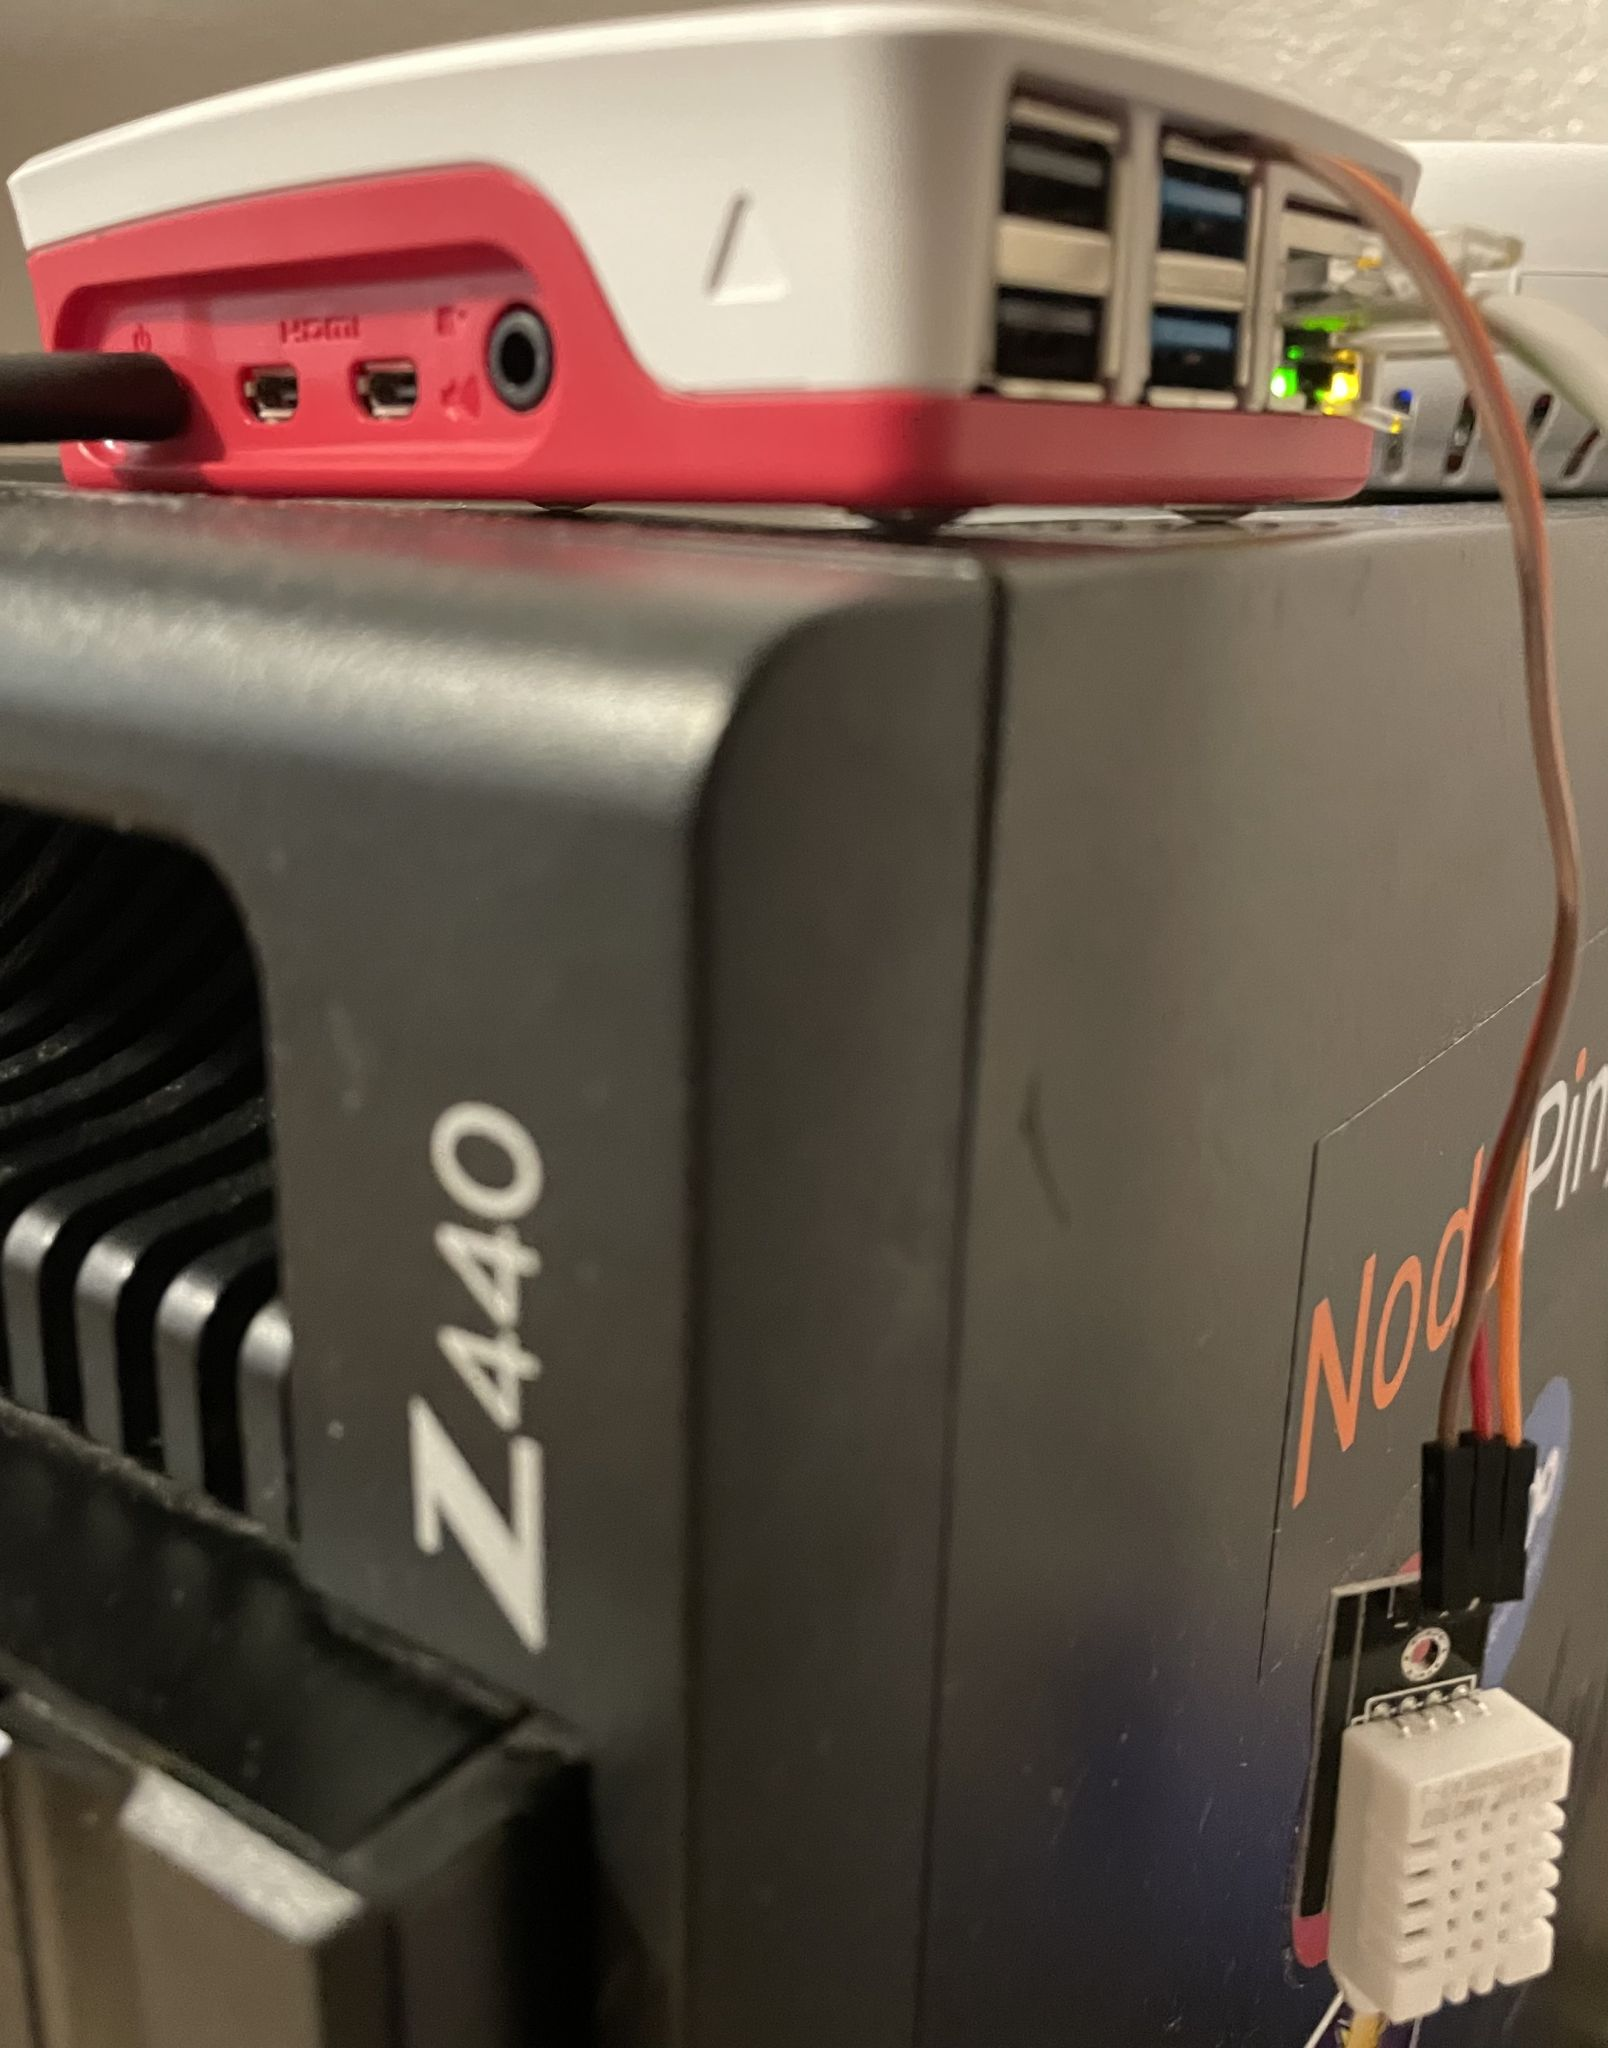
One thing I have noticed with this DHT22 sensor is how steady temperature reporting is. Since I had to calibrate my check for the Sense Hat to account for CPU temperatures, the temperatures were always within +/- 3 degrees of the actual temperature. With this DHT22 sensor, since I have the sensor away from the Pi, the temperature reporting is more steady and makes for cleaner looking results. You can even see from the graph where the humidity dropped when I opened my window, as well as when I had stopped submitting results during testing.

Conclusion
In the end, I found the DHT22 sensor to be a better choice for temperature monitoring . The price is lower and the results are more reliable, and I don’t have to worry about the processor on the Pi messing with the sensor. Additionally, I can use any case I choose and have access to the rest of the GPIO pins if I choose to add more to the Pi.
If you find this to be useful to you and want to try this configuration for yourself you can find all the code needed on the NodePing github. If you don’t yet have a NodePing account, please sign up for our free, 15-day trial.
