Import Script for NodePing

Moving your uptime monitoring to NodePing is now even easier.

We have a fresh Node.js script that will import your checks from Pingdom, StatusCake, or Uptime Robot. *

The script will create contacts, checks, and configure notifications in NodePing to match your current provider.

The script and instructions on how to implement it can be found on our GitHub page. Some services don’t map to NodePing’s features very well so be sure to look at the known limitations section.

If you don’t see your current provider supported by our import script, please let us know and we’ll do our best to get it added.

Don’t have a NodePing account yet? You can sign up for a free, 15-day trial at https://nodeping.com

* service names are trademarked and belong to their respective owners.

Probe Server Changes [AU, AZ] Removal [CH, MO] and Addition [PL]

The following probe servers will be changing IP addresses on 2018/06/06:

Phoenix, Arizona (AZ) – USA is changing from
(104.245.105.2 / 2602:ff97:0:2:225:90ff:fee5:b89)
to
(107.152.108.14 / 2607:f7a0:1:2:225:90ff:fee2:42da)

Sydney, Australia – AU is changing from
(103.25.58.108 / 2406:d501::3f02:2574)
to
(139.99.130.48 / 2402:1f00:8100:230::10)

We’re also adding a new probe to the European region on 2018/06/06:
Warsaw, Poland – PL
(217.182.201.227 / 2001:41d0:602:4e3::10)

The following probes are being removed on 2018/06/06:

Kansas City, Missouri (MO) – USA
(63.141.244.242 / 2604:4300:a:9d:202:c9ff:fec0:da0e)

Zurich, Switzerland (CH) – CH
(5.102.145.51 / 2a06:c01:1:1102::9133:51)

Please adjust your firewalls appropriately if you whitelist so your checks do not fail because of the probe IP address changes.

An always current and updated list of all the IP addresses for our probe servers can be found in the FAQ, a text file, and via DNS query, probes.nodeping.com.


[UPDATE – 2018-06-06 13:20GMT-6] – IP changes and probe addition complete.

Telegram Notifications

This post will provide instructions on how to get NodePing notifications via Telegram using NodePing Webhooks and Telegram Bots.  Webhooks are available in our Business and Provider plans.

The Telegram Bot system is very useful for integrating with Telegram. Nodeping webhooks work seamlessly with the Telegram Bot to send ‘down’ and ‘up’ notifications. It’s a great alternative to SMS that is also cross-platform.

First, you will need to set up a Telegram account for yourself if you haven’t already. This can be done by getting the app on your mobile device or computer (there are Windows/macOS/Linux clients, as well as unofficially supported for FreeBSD). A working phone number will be required to set up an account.

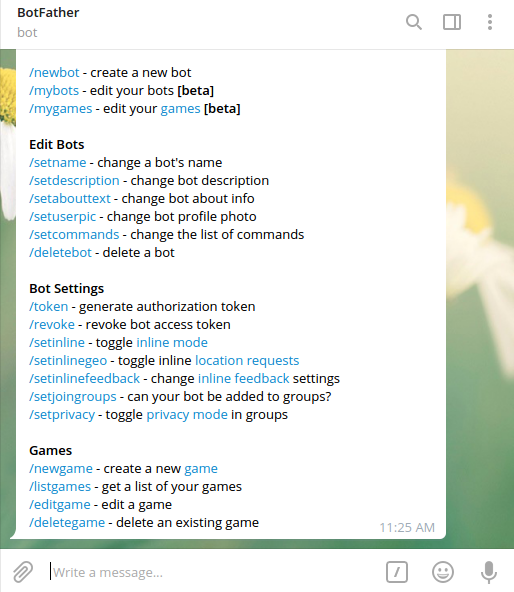
Next, you need to create your own Telegram Bot.  To do this, you’ll have to to chat with Telegram’s own BotFather (a bot that creates other bots – the end is nigh!) You can find it by typing “@BotFather” into the user search bar in Telegram. Once you have started a chat with it, you will be prompted with a message from the BotFather.

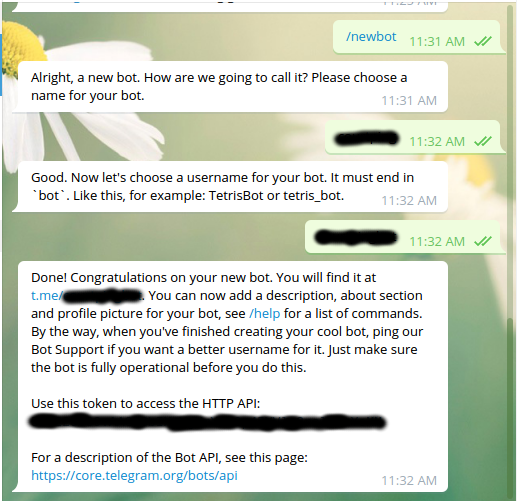
Create your own bot by simply typing “/newbot” and following the instructions that are given. Here is a screenshot of what setting up a new bot setup looks like:

That long token is important.

Now that you have your new Telegram Bot and token, you’ll need to get the ChatID for the user or channel you want to send notifications to. This can be done by starting a chat with your new bot inside Telegram. You would start the chat like you did with BotFather, by typing in @nameofyourbot. Click on your bot, and select “Start” to begin a chat with your bot. Next, you will have to send a single message to the bot. A simple “hello” will suffice. With that done, you can get the ChatID by visting the URL that shows your bot’s updates.  That URL will look like:

https://api.telegram.org/bot<your-secret-bot-token>/getUpdates

Plop that in your browser and you’ll get back some text – JSON formatted text. Look through the JSON response for the ChatID. It will be a random number. It is the “id” in the “chat” object.

Now that you have the ChatID, you’ll need to configure a new Webhook in NodePing. Log in and go to the Contacts tab. Add a new contact and give it a name – like “Telegram Bot”. Select the “Webhook” notification type and change the action to “POST”. Enter the following value in the URL field (replacing <your-secret-bot-token> with… you know, your bot token):

https://api.telegram.org/bot<your-secret-bot-token>/sendMessage

Next, in the Headers section add a new key called “Content-Type” and the value of “application/json”. It should look like this:

Then click on the the Body section.  In the text area, you need to add the following JSON.

{"chat_id":"<your-ChatID>","text":"NodePing: - {label}: {type} is {event}"}

Then save your newly minted webhook.  It’s ready to be added to the notification section of your checks.

Now you can receive NodePing notifications via Telegram!

Your alerts will look something like this.

Telegram bots have a lot more functionality that you can read about.  NodePing webhooks can also do a lot more, like templating and conditional statements, which you can read about.

If you need help getting things working right, please let us know at support@nodeping.com.  If you don’t yet have a NodePing account, please sign up for our free 15-day trial.

[Updated 2023-07-26]

Probe Server Changes [NY] and Addition [MO]

The following probe servers will be changing IP addresses on 2018/05/09:

New York City, New York (NY) – USA is changing from
(168.235.67.200 / 2604:180:2:38f::928a)
to
(66.23.202.26 / 2605:9f80:c000:127::2)

We’re also adding a new probe to the North America region on 2018/05/09:
Kansas City, Missouri (MO) – USA
(63.141.244.242 / 2604:4300:a:9d:202:c9ff:fec0:da0e)

Please adjust your firewalls appropriately if you whitelist so your checks do not fail because of the probe IP address changes.

An always current and updated list of all the IP addresses for our probe servers can be found in the FAQ, a text file, and via DNS query, probes.nodeping.com.


[UPDATE – 2018-05-09 19:00GMT-6] – IP changes and probe addition complete.

Update to TOS and Privacy Policy – NodePing and GDPR

Part of the benefit of being a relatively small distributed company in the Internet cloud age is that we can have a global reach without requiring a lot of infrastructure and overhead. We have customers all over the world, but we have almost no presence anywhere beyond our home office. Our people can work from anywhere with a good Internet connection. Since we work in the cloud, most of our computer systems are in places we have never been. We don’t even handle payment information directly in any of our workplaces. Payment information is passed directly to our payment processors. Working in the cloud age helps all of this work smoothly and safely with very little physical infrastructure required.

The downside of all of that is that our customers are all over the place, including legal jurisdictions all over the world. The regulatory world hasn’t really caught up with the idea of cloud based distributed companies. We want to comply with all applicable requirements, but understanding what requirements apply to us in various locations isn’t always easy.

The GDPR has brought this challenge front and center for us. We do not have any actual presence in any European countries. However, we do have customers in nearly all European countries, and are subject to some data privacy protections where those customers are located. That makes sense, and we want to be good citizens, but as with many other Internet based companies it can be daunting to figure out how the regulations apply to us.

Fortunately for us, the principles established in the GDPR are principles that we were already following in our normal practices. Our customers are businesses and providers of Internet based services, and for the most part we don’t provide services to individual end users. Additionally, our customers manage their own data, have full access to the information in our systems, and we don’t process or use the information they set up in our service beyond what they configure for their own use.

We did find that there were a few requirements related to the GDPR that, while our prior practices were basically already in compliance, weren’t clearly articulated in our Terms of Service or Privacy Policy. So, we’re updating both documents to more clearly set out how our policies and practices address these areas.  The updates will take effect on 2018-05-18

This includes more clearly stating that we are not collecting or processing data beyond what our customers configure to use for their monitoring. We only use contact information in our system to provide the monitoring you configure, and send the notifications you set up in the way you configure them. Our customers can download their own data whenever they want to. Beyond that, we don’t use or process information from our customers.

This is our normal practice, and applies to everyone. We don’t maintain a separate policy for customers in Europe.

Since we are a data processor, and the data is under the control of our customers who are themselves businesses providing services to others, for GDPR purposes we are a Processor rather than a Controller. Since we don’t have a presence in any EU countries, and we provide processing services to controllers in several EU countries, according to the guidelines published by the Article 29 Working Party, the lead supervisory authority will be the supervisory authority that is competent to act as lead for the controller.

If you are a data controller in a European country, or even if you aren’t, you may have questions about our systems that are necessary for you to comply with obligations you have in your location, and for your customers. If you have questions or concerns that aren’t addressed in our updated policies, please let us know.


UPDATE: We have now received our Privacy Shield certification, which required our Privacy Policy to be updated again to meet those requirements.   The most recent changes are aimed specifically at the certification requirements.  As always, you can see our current Privacy Policy and our Terms of Service on our web site.

Probe Server Changes [PY,NC]

The following probe servers will be changing IP addresses on 2018/04/03:

Cary, North Carolina (NC) – USA is changing from
(104.225.1.48 / 2607:fc50:0:15::3a0)
to
Charlotte, North Carolina (NC) – USA
(192.154.255.88 /2604:9980:0:12c:ec4:7aff:fecb:776c)

Philadelphia, Pennsylvania (PY) –  USA is changing from
(154.16.159.242 / 2604:bf00:210:1d::2)
to
(208.82.130.170 /2604:bf00:214::10)

Please adjust your firewalls appropriately if you whitelist so your checks do not fail because of the probe IP address changes.

An always current and updated list of all the IP addresses for our probe servers can be found in the FAQ, a text file, and via DNS query, probes.nodeping.com.


[UPDATE – 2018-04-03 11:35GMT-6] – IP changes complete.

Probe Server Changes [UK,NL,NC,NJ,SG] and removal [ES]

The following probe servers will be changing IP addresses on 2018/02/07:

Manchester, England (UK) – GB is changing from
(185.116.237.211 / 2a06:8181:a0:bfaf::1)
to
Leeds, England (UK) – GB
(109.75.172.133 / 2a00:f9c0:0:405::12)

Amsterdam, Netherlands (NL) – NL is changing from
(176.56.238.119 / 2a00:d880:5:a0f::2)
to
(37.252.125.64 / 2a02:2770:5:0:21a:4aff:fe1a:c131)

Asheville, North Carolina (NC) – USA is changing from
(64.187.224.66 / 2605:a880:0:36::10)
to
Cary, North Carolina (NC) – USA
(104.225.1.48 / 2607:fc50:0:15::3a0)

Newark, New Jersey (NJ) – USA is changing from
(185.35.78.51 / 2001:19f0:1604:3ede:250:56ff:feae:67ec)
to
(23.226.135.34 /2607:fcd0:ccc0:1301::10)

Singapore (SG) – SG is changing from
(103.16.16.30 / 2001:df0:24f:214::10)
to
(172.104.181.238 /2400:8901::f03c:91ff:feb9:fbf4)

The following probe is being removed on  2018/02/07:
Madrid, Spain (ES) – ES
(185.4.92.30 / 2a02:4ac0::2002)

Please adjust your firewalls appropriately if you whitelist so your checks do not fail because of the probe IP address changes.

An always current and updated list of all the IP addresses for our probe servers can be found in the FAQ, a text file, and via DNS query, probes.nodeping.com.

[UPDATE – 2018-02-07 10:35GMT-7] – IP changes and probe removal complete.

Cluster Check

Allow me to introduce our newest check type, Cluster.

The Cluster check allows you to group interdependent NodePing checks in order to get notifications and track availability of the group of checks as a whole. You specify a threshold of how many of those checks must be passing in order for the cluster to be considered ‘up’. If the number of those checks passing drops below your configured threshold, the cluster check will fail and send the configured notifications.

We use it to keep an eye on our Cassandra servers but you can use it for any logical group of services that are interdependent. Some other use cases:

  • DNS services – monitor each DNS server with DNS checks and then a cluster check on those DNS checks to get that very important alert when all DNS servers are offline!
  • Web servers – monitor the backend web servers behind your reverse proxy or load balancer to make sure you have enough of them available to handle the traffic.
  • SMTP – monitor your SMTP checks and know that there’s always at least one server available to receive email for your domains.

Cluster checks are available to all NodePing plans today. If you’re not using NodePing yet, please sign up for our 15-day, free trial today.


Banana image Designed by Daviles / Freepik

Probe Server Changes and Addition [IT,UK,CH,JP,CA,OR,GA]

The following probe servers will be changing IP addresses on 2017/12/05:

Manchester, England (UK) – GB is changing from
(194.187.248.8 / 2001:ac8:21::b0)
to
(185.116.237.211 / 2a06:8181:a0:bfaf::1)

Tokyo, Japan (JP) – JP is changing from
(106.186.116.86 / 2400:8900::f03c:91ff:fedb:b594)
to
(180.149.230.17 / 2406:d500:9::7a91:9b75)

Los Angeles, California (CA) – USA is changing from
(184.170.243.202 / 2607:f7a0:3:8:225:90ff:fe51:d0b0)
to
(192.161.172.202 / 2607:fcd0:106:ab01::10)

Portland, Oregon (OR) – USA is changing from
(69.163.39.244 / 2605:ea00:1:1:d267:e5ff:fee7:51c)
to
(100.42.30.2 / 2604:B480:FFF6::10)

Atlanta, Georgia (GA) – USA is changing from
(66.71.251.162 / 2607:f7a0:6:a:225:90ff:fe79:4318)
to
(107.150.22.26 / 2607:fcd0:aa80:2200::10)

We’re also adding a new server to the Europe region on 2017/12/05:
Zurich, Switzerland (CH) – CH
(5.102.145.51 / 2a06:c01:1:1102::9133:51)

The following probe is being removed on 2017/12/05:
Milan, Italy (IT) – IT
(185.93.183.12 / 2001:ac8:24::40)

Please adjust your firewalls appropriately if you whitelist so your checks do not fail because of the probe IP address changes.

An always current and updated list of all the IP addresses for our probe servers can be found in the FAQ, a text file, and via DNS query, probes.nodeping.com.

[UPDATE – 2017-12-05 10:53GMT-7] – IP changes and probe addition/removal complete.

The NodePing API and PowerShell

At NodePing we interact with our own API quite a bit from the command line.  Most of that is from bash on Linux, because that’s where we live most of our lives.  But the API works well from just about any scripting environment.  Since our documentation examples all use curl with bash syntax, it seemed like it might be a good idea to also write up some examples of using other tools.  Here, as the first installment of that effort, is a handful of examples of using PowerShell with the NodePing API.

Full disclosure: PowerShell is not an environment we spend a lot of time working with.  There are likely ways to do some of this better.  We’ve tested the example calls in this post.  Hopefully it is enough to get you started if you work with PowerShell.

Basic GET Calls

Basic calls are quite simple to make using Invoke-RestMethod.  If you have the check ID, getting a check is quite easy:

Invoke-RestMethod ‘https://api.nodeping.com/api/1/checks/201205050153W2Q4C-OJ2HSIRF?token=[token]’

This returns a JSON object, which PowerShell handles easily.

_id : 201205050153W2Q4C-0J2HSIRF
description : This is the description, if the check has one.
public : False
customer_id : 201205050153W2Q4C
queue : nyI8JSL23W
interval : 1
created : 1427513104608
pro : nodeping.com
modified : 1510332098196
parameters : @{target=https://example.com/; follow=False; threshold=5; sens=2; invert=False; verify=false}
firstdown : 0
label : Keep me
runlocations : False
enable : active
uuid : bd3eha9o-z2m5-4qg2-9k8b-jqq0kiituyxz
state : 1
status : assigned
notifications : {}
type : HTTP
acctdisable : False
suspacct : False
dep : False

Note that “parameters” is another hash.  You can refer to the fields in the check as properties of the returned object, including properties that are hashes themselves.  So, for example, this will give you the check check threshold, which is part of “parameters”.

$check = Invoke-RestMethod ‘https://api.nodeping.com/api/1/checks/201205050153W2Q4C-0J2HSIRF?token=[token]’ ;
$check.parameters.threshold;

API Authentication

PowerShell doesn’t easily support basic authentication.  Since the NodePing API supports passing the token as a parameter, the easiest approach is to include it in the query string, as I did in the example above.  In most cases I prefer to pass it in the Body, as I’ll show in examples below.  If you’re working with a script its usually easiest to set a $token variable and use that throughout your script.  If you’re just sending a URL as I did in the simple GET calls above, actually putting in the query string works fine.

If you’re using the API in scripts that make several calls to the API, you might want a more reusable way to pass the token that keeps it out of your Body.  You can do this by manually building the headers.  That requires base64 encoding the credentials and then setting that using the -Headers argument. That looks something like this:

$hash = [Convert]::ToBase64String([Text.Encoding]::ASCII.GetBytes(("{0}:{1}" -f $token,"")))

Then set the -Header argument to @{Authorization=(“Basic {0}” -f $hash)}

Or, if you are doing this several times, you will probably want to set this to a variable you can reuse.

Some sites suggest that you create a credential object using ConvertTo-SecureString and Management.Automation.PSCredential, and pass that using the -Credential argument.  However, this won’t work with the NodePing API, since the -Credential option waits for the challenge to send the authorization header.  The API is stateless, and expects the header on each request.

Put and Post Calls

We recommend that you use JSON to set fields for our API in most environments.  However, PowerShell does not automatically handle sending the body as JSON.  For POST calls, this isn’t a big deal, and you can just POST the body as it is and Invoke-RestMethod sends the data as if it were a form.  PUT and DELETE calls don’t work that way.  For those, you have to convert to JSON, or include all of your parameters in a query string.

Creating a check looks like this:

Invoke-RestMethod 'https://api.nodeping.com/api/1/checks' -Method Post -Body @{ 
    label='test label' 
    type="HTTP"
    target="http://example.com"
    token=$token 
}

This call will return an object with the new check.  You can add any of the other fields listed in our documentation.

Updating a check is almost the same.  This can all be done on one line, but we’ll split it out here to make it easier to see.

$data = @{ label='a new label'; type="HTTP"; interval=5; token=$token } | ConvertTo-Json
Invoke-RestMethod 'https://api.nodeping.com/api/1/checks/201205050153W2Q4C-0J2HSIRF' -Method Put -Body $data

Note that since we’re updating a check, we need to include the check ID.  As with the Post call, the Put call returns the updated check object.

Working with Lists of Checks

Working with a list of checks is slightly trickier.  The call returns a JSON object with a list of checks using the ID as the key.  For PowerShell, this is a hash table of hashes.  So to list checks, you would do something like this:

Invoke-RestMethod 'https://api.nodeping.com/api/1/checks' -Body @{ token=$token } | %{ $_.PSOBJECT.Properties.value }

This is actually fairly handy, because you can fairly easily list a specific field from the response.  For example, this lists all of the targets from all of the checks on this account:

Invoke-RestMethod 'https://api.nodeping.com/api/1/checks' -Body @{ token=$token } | %{ $_.PSOBJECT.Properties.value.parameters.target }

You could do all sorts of things at this point.  For example, here’s a list of all checks that include “nodeping” somewhere in the check’s target:

Invoke-RestMethod 'https://api.nodeping.com/api/1/checks' -Method Get -Body @{ token=$token } | %{ foreach($value in $_.PSOBJECT.Properties.value){ if($value.parameters.target -like "*nodeping*"){ $value } } }

This is practical as a way to find a check with a specific target up to a few thousand checks.

Getting Results

Applying the same principles should let you do just about anything with the NodePing API.  Applying the same pattern to a results call, for example:

Invoke-RestMethod 'https://api.nodeping.com/api/1/results/201205050153W2Q4C-0J2HSIRF' -Method Get -Body @{ token=$token; limit=2; clean=1 }

Note that you’ll want to always include the “clean” parameter for results.  The unclean response takes more parsing.

The options available for results calls are documented here:
https://nodeping.com/docs-api-results.html

Profit!

That’s the basics of using PowerShell to interact with the NodePing API.  With the API you can add checks, remove checks, get your results and uptime, manage contacts and notifications, and add and manage subaccounts.  Our customers use the API both for programmed integrations, and from the command line using quick scripts like the ones I demonstrated here to make quick changes to several (or lots) of checks at once.

If you’re doing interesting things with PowerShell and the NodePing API, we’d like to hear about it!  Please email support and let us know.  That’s also a great place to ask us questions.  We’re happy to help people interact with our service.