Announcing: RDAP Check type — A Smarter Way to Watch Your Domains
We’re excited to introduce our newest monitoring check type, RDAP. Ever wish you could proactively know when your domains are about to expire, or ensure the nameservers configured at your registrar haven’t been changed? RDAP Checks make it easy.
What Is an RDAP Check?
RDAP (Registration Data Access Protocol) is essentially a modern, structured successor to WHOIS, letting you pull domain, ASN, or IP registration data over HTTP in JSON format. Unlike legacy WHOIS queries, RDAP delivers rich, programmable data with support for internationalization and extensibility about.rdap.org.
Now, NodePing can monitor that data for you! Use RDAP Checks to:
Stay ahead of domain expiration — never forget that renewal.
Ensure infrastructure consistency — verify nameservers and registration data on your schedule.
Monitor your RDAP services — get alerted instantly if your RDAP endpoint goes down.
Get actionable feedback — diagnostics help you pinpoint the issue faster.
At NodePing we strive to make monitoring smarter, easier, and more versatile. RDAP Checks slot right into that vision—whether you’re managing domains, enforcing infrastructure integrity, or keeping your RDAP services reliable.
Ready to try it? Head to your NodePing dashboard and give RDAP Checks a spin. Don’t have an account yet? No problem, sign up for a free, 15-day trial. As always, support is just an email away if you need help making it perfect.
With a Starlink antenna on hand, we thought it would be a fun experiment to see what the results would be of monitoring a Starlink connection from a residential connection with our AGENT check type. The AGENT check can be used to monitor any outbound connectivity from your location on any network. Starlink was an interesting case study for us to try our AGENT monitoring from. Some information we wanted to see was:
ICMP reliability
Packet loss out to the internet
HTTP connections
DNS queries
We targeted a handful of popular services, including our own blog page as well as a website that is hosted in Seattle. We targeted these DNS providers:
Google DNS
Quad9
Cloudflare
OpenDNS
For popular websites, we targeted:
Facebook
google.com
Our blog (WordPress)
An employee blog site in Seattle
These were all tested over IPv4 and IPv6, each website had its DNS record monitored over the different DNS providers, as well as HTTP monitoring directly to an IP address for that site to rule out DNS issues.
Hardware
To connect to Starlink’s network, the standard antenna was used. The computer was a Raspberry Pi 4 running Raspberry Pi OS.
ICMP Monitoring
The route that was taken from my current location was through Starlink’s network and then back down through Seattle and then out to the rest of the Internet. Below is an MTR from the home network to blog.nodeping.com on WordPress:
We assigned both PING and MTR checks to our NodePing AGENT. One to have a simple ping to check uptime, and the MTR to monitor packet loss and other networking statistics.
PING Monitors
After a month of monitoring, the results showed that my average ping uptime was roughly around 99.6% for IPv6 and 99.8% for IPv4
The majority of incidents were 1 minute timeouts. Only a few longer outages occurred. A few outages are noteworthy:
A 10 minute outage while the antenna was moved out of the way and obstructed
A 36 minute outage that was consistent with full network downtime shown by the other results
A 7 minute outage that also consistently happened with other checks
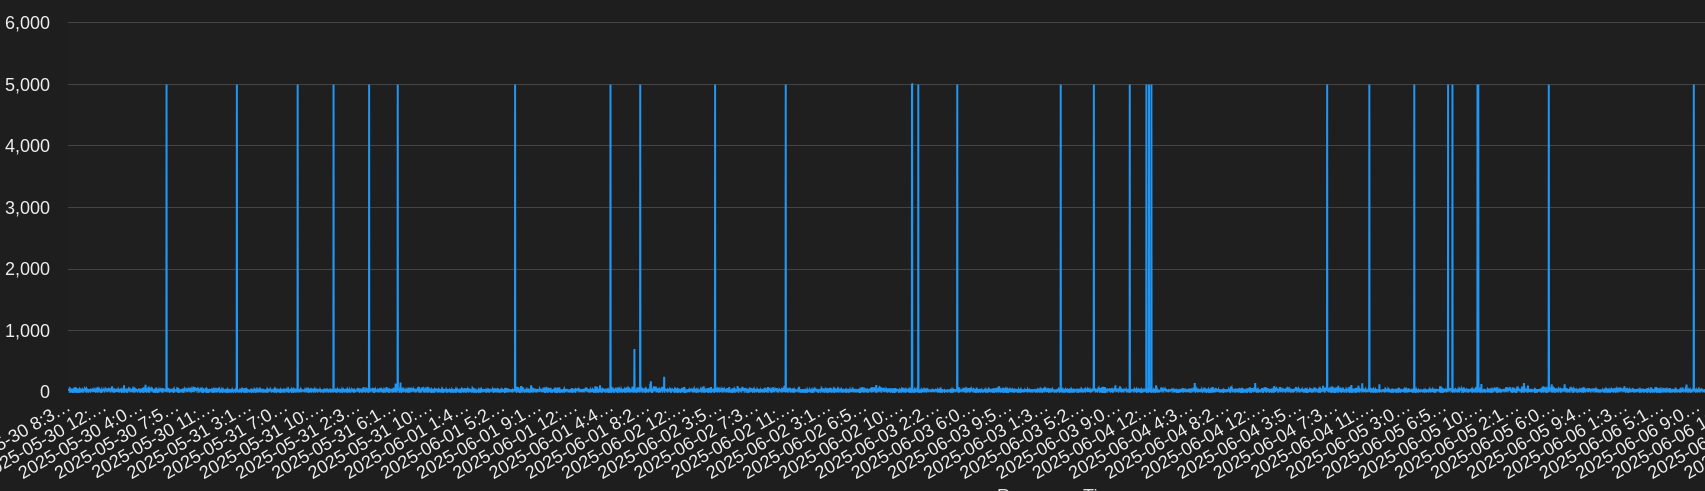
The average day showed about 10-20 events when there was typically a 1 minute timeout. This is roughly a 7-day sample of pinging Google’s site:
Generally, response times were very good and in the 20-30ms range with some blips up to about 100ms.
MTR Monitors
Our MTR monitoring paints a somewhat similar picture. The average uptime was about 99.7% to 99.9%. This is running an MTR count of 10 and expecting packet loss to be below 5%. Some observations:
A time when Google IPv6 had high packet loss for 9 minutes, at the same time OpenDNS was unreachable for 7 minutes
Moving the antenna was detected just like with the PING checks. This resulted in roughly 10% to 50% packet loss incidents
Like PING, there were quite a few times running an MTR would show packet loss or an unreachable target for a minute
I noticed most of my checks had packet loss more often in the evenings
At one point Google and Facebook had high packet loss or were unreachable for about 40 minutes
Below are some results from the MTR check to Facebook over IPv6:
I noticed that inter arrival jitter was high. The average seemed to be roughly in the 30s, however, it would also frequently go up into the upper 100s. This could potentially impact RTP streams.
Other Monitoring
DNS Monitors
During my testing, DNS checks were rather boring. The overall uptime was 99.9% with minimal timeouts or other issues. One day OpenDNS, Cloudflare, and Google DNS had 3 to 5 minutes of timeouts, but at different times of the day. Some days Quad9 ended up doing worse than others, but overall all the DNS services had that 99.9% uptime. At some times some services would timeout at the same time, but not others. Average responses were around 30-60ms. There were some incidents that happened, but I will expound on those in the next section.
Earlier it was noted that the antenna was moved and obstructed for a little while. All the checks were impacted by this obstruction. However, DNS was not.
HTTP Monitors
Last of all, HTTP monitors. The average uptime was 99.8%. While monitoring HTTP, I was able to use information from my DNS checks to get additional insights into the failures. While an HTTP check will mention it cannot resolve a hostname, the DNS checks provided additional detail into DNS failures and helped me to identify the cause of failed HTTP connections. For example, one day there was about a 5 minute window of failures when some hosts were unable to resolve hostname and others were getting ENETUNREACH errors. My default DNS resolver was Google DNS. At that time, I noticed that the other DNS services were not failing, only Google DNS. With that information, I was able to determine that I was unable to reach my websites because of the DNS provider I was using.
For some of my HTTP checks, I set some of the targets to be the IP address only so DNS was not resolved. At times when failures happened, I could see if the DNS and no DNS checks were failing. If they were, the site was unreachable. If only the DNS checks were failing, then the issue was likely with DNS. There was one outage that was 36 minutes long where my DNS and no DNS checks were failing.
The TLS EACCES errors show that a secure TLS connection could not be established. This often happens when there is a networking issue, since I know that the TLS certificates on the end are correct. This is especially obvious here since the TLS connection failures are happening to multiple services.
Conclusion
After a month of monitoring, it is clear to see that there is some network instability with Starlink. The service could not quite reach three 9s outbound. This could be perfectly sufficient for some, however, mission critical services will likely have frequent reachability issues.
Using AGENTs to monitor my Starlink connection provided me with some interesting results. While using our public probes, there were no incidents with the services I monitored. Using an AGENT to monitor outbound connections to services provided useful data to determine connectivity issues to commonly used services. This is useful when you need to monitor for incidents from a Starlink or any other remote connection and respond to them.
If you have any remote POPs that you need to monitor, try out our NodePing AGENTs today. We offer a free, no-obligation 15-day trial. The best way to see if NodePing meets your needs is to try it out.
The following server will be added to the North America Region on 2025/06/25:
Detroit, Michigan (MI) – USA (74.80.184.138 / 2620:11f:7001:3::10)
Additionally, we are changing the following probe server on 2025/06/25:
Melbourne, Australia (AM) – AU (144.48.37.241 / 2404:f780:2:950:216:3cff:feb8:ab8e) will change to (144.48.37.241 / 2406:d500:7:2::43)
Lastly, we are also removing the following probe server from the North America region on 2025/06/25:
Philadelphia, Pennsylvania (PY) – USA (208.82.130.170 /2604:bf00:214::10)
Please adjust your firewalls appropriately if you whitelist so your checks do not fail because of the probe IP address changes.
An always current and updated list of all the IP addresses for our probe servers can be found in the FAQ, a text file, and via DNS query, probes.nodeping.com.
[UPDATE – 2025-06-25 11:33GMT-7] – IP changes complete.
We will be changing the following probe server in the EAO region on 2025-05-27:
Sydney, Australia (AU) – AU (112.213.38.162 / 2404:9400:2:0:216:3eff:fee1:bce0) to (45.77.48.69 / 2401:c080:1800:1513:5400:5ff:fe62:f221)
We will be removing the following probe server from the NAM region on 2025-05-27:
Toronto, Ontario (OT) – CA (172.105.6.187 / 2600:3c04::f03c:92ff:fe9b:dd03)
Please adjust your firewalls appropriately if you whitelist so your checks do not fail because of the probe IP address changes.
An always current and updated list of all the IP addresses for our probe servers can be found in the FAQ, a text file, and via DNS query, probes.nodeping.com.
[UPDATE – 2025-05-27 11:43GMT-7] – IP changes complete.
The following server will be added to the North America Region on 2025/04/01:
Atlanta, Georgia (GA) – USA (23.111.153.22 / 2604:4500:5:54::10)
Additionally, we are changing the following probe server on 2025/04/01:
Ashburn, Virginia (VA) – USA (172.82.138.70 / 2607:3f00:1:a::10) to (199.233.235.34 / 2607:3f00:1:a::10)
Lastly, we are also removing the following probe server from the Europe region on 2025/04/01:
Madrid, Spain (ES) – ES (23.142.26.105 / 2604:86c0:f503:1::2)
Please adjust your firewalls appropriately if you whitelist so your checks do not fail because of the probe IP address changes.
An always current and updated list of all the IP addresses for our probe servers can be found in the FAQ, a text file, and via DNS query, probes.nodeping.com.
[UPDATE – 2025-04-01 11:15GMT-7] – IP changes complete.
Lastly, we are also removing the following probe server from the North America region on 2025/03/04:
Newark, New Jersey (NJ) – USA (209.205.207.243 / 2a06:8640:198::2)
Please adjust your firewalls appropriately if you whitelist so your checks do not fail because of the probe IP address changes.
An always current and updated list of all the IP addresses for our probe servers can be found in the FAQ, a text file, and via DNS query, probes.nodeping.com.
[UPDATE – 2025-03-04 12:54GMT-7] – IP changes complete.
Recently, Let’s Encrypt announced they will be ending support for expiration notification emails by June 4, 2025. With this upcoming change, many are looking to alternate ways to monitor certificate expiration dates. At NodePing, we offer the capability to monitor your SSL certificates with our SSL check. Our SSL check lets you monitor certificate validity as well as notify you when your certificate is about to expire, that way you can make sure your certificate renewals are happening as you would expect, and fix it when it’s not.
Using the SSL Check
Our SSL check isn’t just limited to monitoring port 443 on your web server. You can also monitor non-website TLS services by using the URL port convention. For example, setting the target to “https://example.com:8000”. The check can be used to monitor SSL certs on services such as DoH, MQTT, Websockets, email, anything that accepts a TLS connection.
The most popular use for the SSL check is to monitor for an expiration date and alert the user at a defined number of days before expiration. However, the SSL check is also useful for diagnosing certificate chain errors. This can be useful to diagnose missing intermediary certificates or mismatched certificates in the SSL chain, for example.
If you don’t have a NodePing account yet, give it a try! We offer a free, no-obligation 15-day trial. The best way to see if NodePing meets your needs is to try it out.
The following probe server will be added to the Europe region on 2025/01/29:
Madrid, Spain (ES) – ES (23.142.26.105 / 2604:86c0:f503:1::2)
Additionally, we will be adding the following probe server to the East Asia/Oceania region on 2025/01/29:
Brisbane, Australia (BN) – AU (43.245.160.182 / 2407:a080:2000:f::a1)
Lastly, we are also removing the following probe server from the East Asia/Oceania region on 2025/01/29:
Sydney, Australia (AU) – AU (112.213.38.162 / 2404:9400:2:0:216:3eff:fee1:bce0)
Please adjust your firewalls appropriately if you whitelist so your checks do not fail because of the probe IP address changes.
An always current and updated list of all the IP addresses for our probe servers can be found in the FAQ, a text file, and via DNS query, probes.nodeping.com.
[UPDATE – 2025-01-29 16:30GMT-7] – The IP addition for the Madrid, Spain server is complete. The planned changes for the Brisbane addition and Sydney removal did not happen like we expected. We are not going to add the Brisbane server, and we will be keeping the Sydney server. Probe stability is one of our highest goals and in the end, the Brisbane server did not meet our high standards for stability.
NodePing supports OpenID Connect (OIDC) authentication, allowing you to leverage SSO and multi-factor authentication by using an authentication provider that supports them. We support Google and Microsoft OpenID authentication as well as (on Premiere plan accounts) custom OIDC providers.
In a previous blog post we shared how you can get started with using OIDC with NodePing using Keycloak. In this blog post, I will share with you how you can get Microsoft Entra set up to handle authentication for you with NodePing’s custom OIDC provider feature.
Entra User Configuration
Before configuring Entra to work with NodePing, it is important to make sure your users have the proper configuration. The NodePing contact must include the same email address as your user has in Entra. To ensure your email address in Entra is correct for your user, go to Identity -> Users -> All users. Select the user you want to update, click Edit properties and go to the Contact Information tab.
Ensure that the Email field matches the email that you have set for your NodePing contact. Note that if the email is present only in the “Other emails” section in Entra, logging into NodePing will fail. On the NodePing side, the contact records can have multiple emails, and the address from Entra just needs to be present as one of them.
Entra Admin Center
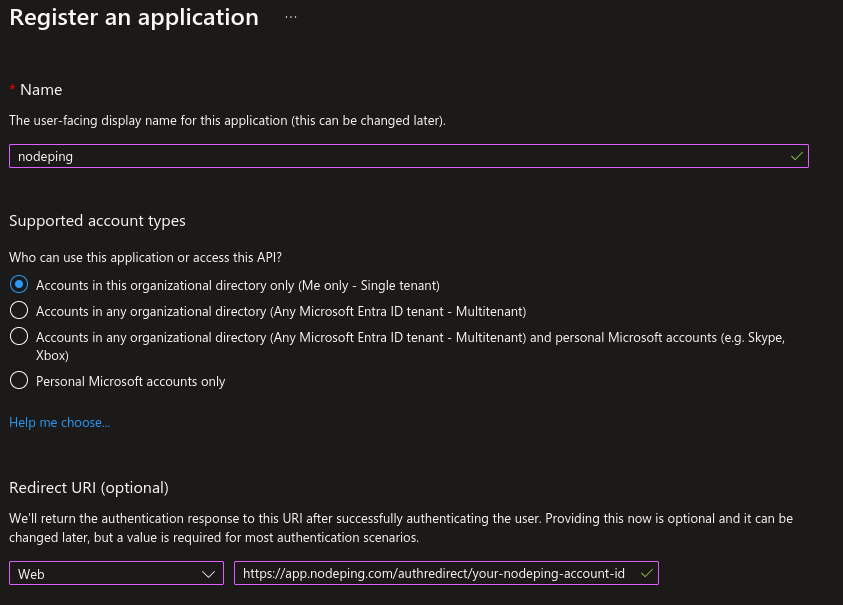
Head to the Entra Admin Center and in the left side panel go to Identity -> Applications -> App registrations. There, select “New registration” to create a new registration. Enter a name, such as “nodeping” and select the supported account types. In this example, I chose “Accounts in this organizational directory only”.
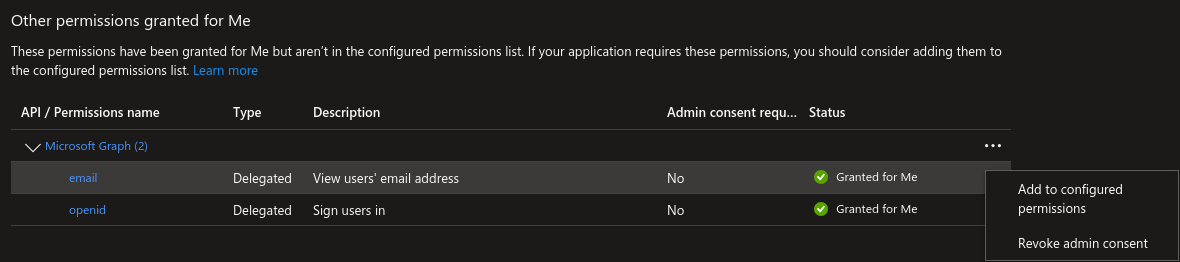
Afterwards, go to “API permissions” and go down to the “Other permissions granted for” section. You should see a Microsoft Graph Permissions name labeled “email”. Click the 3 dot menu and choose “Add to configured permissions”.
You will be prompted to select “Yes, add”.
If the email permission isn’t in the “Other permission” section, select “Add a permission”, and in the right side panel that pops up select Microsoft Graph, then Delegated Permissions, and check the email checkbox in the OpenId permissions section below, and select “Add permissions”.
Following that, you will need to generate a secret. Go to “Certificates & secrets” and select “New client secret”. Give it a description and expiration according to your organizational needs. You will need the Value for the next step.
NodePing Custom OIDC Configuration
On NodePing, sign in and go to Account Settings -> OpenID Connect.
Here you will need:
The Discovery URL
The Client ID
The Client Secret
The Discovery URL can be found in the Overview section, and selecting Endpoints. You will need the URL labeled “OpenID Connect metadata document”. Paste that into the Discovery URL. For the clientID, you need the Application (client) ID displayed in the overview page of your App registration you made on Entra. Lastly, the clientSecret that was generated earlier in the “Certificates & secrets” page in Entra. Note here that the clientSecret is the “Value,” a long string with special characters. There is also a “Secret ID” listed with the secret, but that is not what you need here.
Once complete, click save.
NodePing User Auth Types
Now, configure your NodePing user to sign in with custom OIDC. In NodePing’s webapp, go to Contacts -> List Contacts. Edit the contact you want to permit OIDC authentication with by selecting “Custom OIDC Authentication” as an allowed auth type and save the contact. This option will only be present for those who have a Premiere account. This NodePing contact will need the same email address that corresponds with the email address of the Entra user.
Logging In
To login to NodePing using Entra, visit https://app.nodeping.com/login/[your NodePing account id] and signed in there. This should direct you to Entra where you can sign in. If everything worked, you should be back at NodePing and signed in. Alternatively, on the login page, change the login method to “Custom OIDC Authentication” in the Login Method dropdown menu and enter your NodePing account ID there.
This blog post isn’t intended to address other policies or settings you may have to set up with Entra, or how to make policies for your users. This basic example configuration is a starting point toward integrating Entra with NodePing. Ensure that your configuration of users and other policies are in alignment with your organization’s requirements and adjust as necessary. For additional information, Microsoft provides some resources here and here to guide you through configuring OpenID Connect authentication with Entra.
If you don’t have a NodePing account yet, give it a try! We offer a free, no-obligation 15-day trial. The best way to see if NodePing meets your needs is to try it out.
NodePing supports OpenID Connect (OIDC) authentication, allowing you to leverage SSO and multi-factor authentication by using an authentication provider that supports them. We support Google and Microsoft OpenID authentication as well as custom OIDC providers.
In a previous blog post we shared how you can get started with using OIDC with NodePing. In this blog post, I will share with you how you can get Keycloak set up to handle authentication for you with NodePing’s custom OIDC provider feature.
Server Setup
When setting up Keycloak, I chose to install Keycloak on the current Ubuntu LTS, Ubuntu 24.04. I first made sure everything was up to date on the server, then I installed openjdk and postgresql:
If you have existing SSL certificates, place them on the server. In this tutorial, I am going to assume you already have certificates that Keycloak will use.
PostgreSQL
Next, a database needs to be created for Keycloak. Sign into the postgres user and use psql to access the database. Run these commands in postgres to create the database:
CREATE DATABASE keycloak;
CREATE USER keycloak WITH PASSWORD 'replace-this-with-a-good-password';
GRANT ALL PRIVILEGES ON DATABASE keycloak TO keycloak;
\c keycloak
GRANT ALL ON SCHEMA public TO keycloak;
Since this is on Ubuntu, I created a system unit file to make starting/stopping the server easy. I made this unit file at /etc/systemd/system/keycloak.service
Once the server is successfully started and you are able to login, go back and edit the keycloak.service file and remove the KEYCLOAK_ADMIN and KEYCLOAK_ADMIN_PASSWORD environment variables, then run the above systemctl commands again to make sure everything is working well.
Configuring Keycloak
By default, Keycloak listens on port 8443 for secure connections. Up to this point, the example server would be accessed at https://example%5Bdot%5Dcom:8443.
Keycloak has a master realm for management of other realms. It is best to create another realm for users to have access to. Create a new realm by clicking the “Keycloak” dropdown menu in the upper left corner and select “Create realm”. I entered the name of the realm as NodePing for this example, but it can be anything. Then I selected “Create” and went to the new realm.
To have Keycloak authenticate with NodePing, a new Client needs to be created that can handle all the proper communications. Go to the Clients page and click “Create client”.
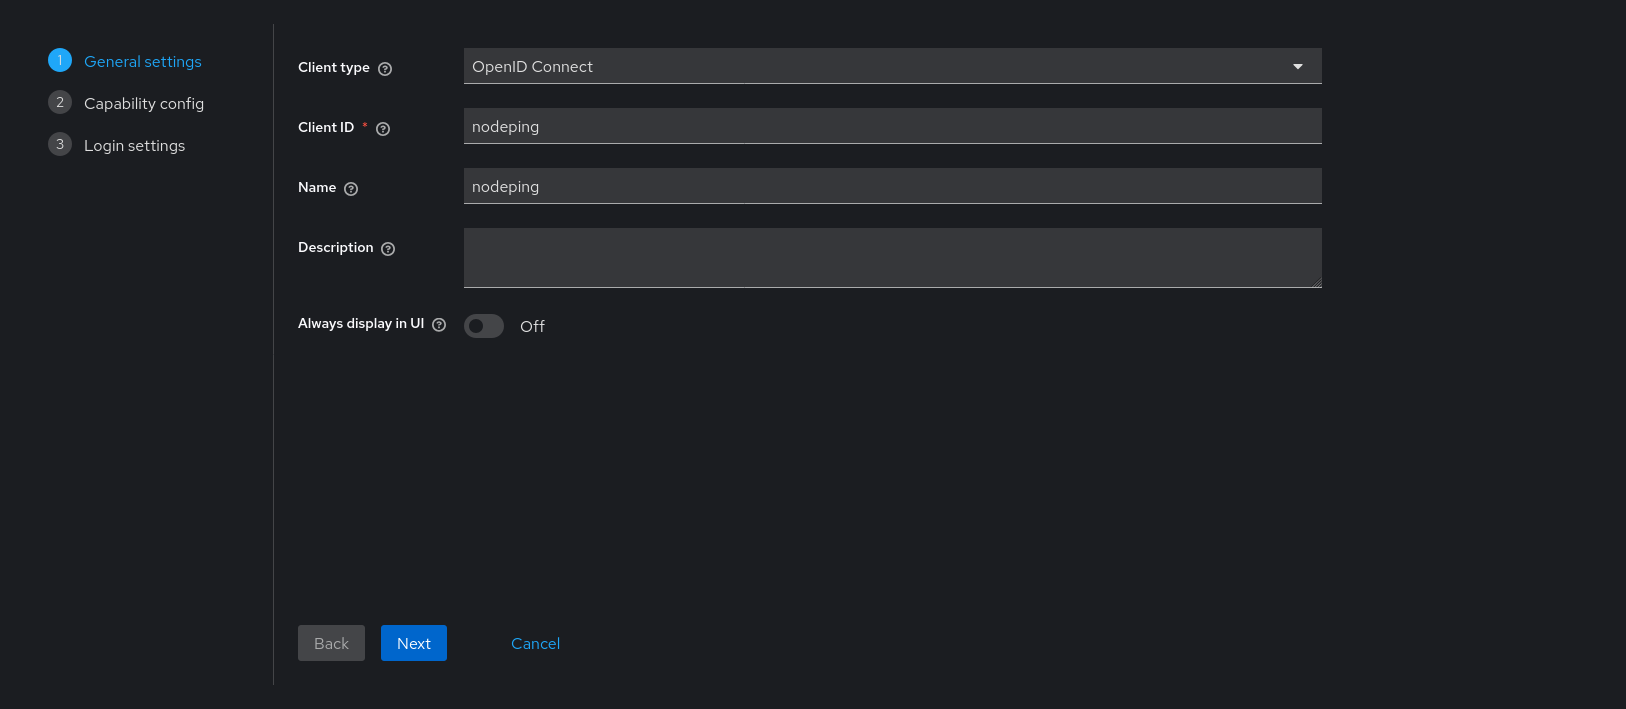
Fill out the first page of the new client. The client ID and name can be anything. The Client ID entered here will be part of configuring NodePing.
Click next. On page 2, set “Client authentication” to On.
Here, only “Valid redirect URIs” needs a value. It should look like this:
Select “Save”. Keycloak is ready to use with NodePing.
NodePing Custom OIDC Configuration
On NodePing, sign in and go to Account Settings -> OpenID Connect
Here, I need:
The Discovery URL
The Client ID
The Client Secret
The Discovery URL can be found in the “Realm Settings” page. Go down to the Endpoints section. Copy the URL named “OpenID Endpoint Configuration”. It should look something like https://example[dot]com:8443/realms/NodePing/.well-known/openid-configuration.
The Client ID is what I entered on the first configuration page when creating the Client. I called it “nodeping”.
Lastly, I need the secret. This is found in the Client information. Go back to Clients -> nodeping -> Credentials. The Client Secret is there. Paste it into the clientSecret section in NodePing and select Save.
NodePing User Auth Types
Now, I can configure a user to sign in with custom OIDC. In NodePing’s webapp, go to Contacts -> List Contacts. I edited the contact I want to permit OIDC authentication with by selecting “Custom OIDC Authentication” as an allowed auth type and saved my contact. This NodePing contact will need the same email address that corresponds with the email address of the Keycloak user.
Next I have to go to a different URL to do my custom OIDC sign in. I visited https://app.nodeping.com/login/[your NodePing account id] and signed in there. This should direct me to Keycloak where I can sign in. If everything worked, I should be back at NodePing and signed in. Alternatively, on the login page I can change the login method to “Custom OIDC Authentication” in the Login Method dropdown menu and enter my NodePing account ID there.
If you run into any troubles, you can reference the previous blog post for information. Additional information is provided in the custom OpenID Connect page to know what information you need to provide and how to login. If any issues arise in configuring Keycloak, Keycloak has a comprehensive server administration guide available.
If you don’t have a NodePing account yet, give it a try! We offer a free, no-obligation 15-day trial. The best way to see if NodePing meets your needs is to try it out.
NodePing is an Internet web site and server monitoring service at an amazing price, allowing you to check all your website and servers as frequently as every minute, for as little as $10 a month. Our low prices include unlimited international SMS, slack, and email notifications. The 'Premiere' plan also includes unlimited voice notifications.







 NodePing