NodePing Authentication with Keycloak OpenID Connect
2024/09/10 Leave a comment
NodePing supports OpenID Connect (OIDC) authentication, allowing you to leverage SSO and multi-factor authentication by using an authentication provider that supports them. We support Google and Microsoft OpenID authentication as well as custom OIDC providers.
In a previous blog post we shared how you can get started with using OIDC with NodePing. In this blog post, I will share with you how you can get Keycloak set up to handle authentication for you with NodePing’s custom OIDC provider feature.
Server Setup
When setting up Keycloak, I chose to install Keycloak on the current Ubuntu LTS, Ubuntu 24.04. I first made sure everything was up to date on the server, then I installed openjdk and postgresql:
$ apt install openjdk-21-jdk postgresql postgresql-contrib
Next, I created the keycloak user:
$ groupadd keycloak
$ useradd -r -g keycloak -d /opt/keycloak -s /sbin/nologin keycloak
I fetched the latest keycloak tarball and extracted it:
$ wget https://github.com/keycloak/keycloak/releases/download/25.0.4/keycloak-25.0.4.tar.gz
$ mkdir /opt/keycloak
$ tar -zxf keycloak-25.0.4.tar.gz --strip-components=1 -C keycloak/
$ chown -R keycloak: /opt/keycloak
If you have existing SSL certificates, place them on the server. In this tutorial, I am going to assume you already have certificates that Keycloak will use.
PostgreSQL
Next, a database needs to be created for Keycloak. Sign into the postgres user and use psql to access the database. Run these commands in postgres to create the database:
CREATE DATABASE keycloak;
CREATE USER keycloak WITH PASSWORD 'replace-this-with-a-good-password';
GRANT ALL PRIVILEGES ON DATABASE keycloak TO keycloak;
\c keycloak
GRANT ALL ON SCHEMA public TO keycloak;
Keycloak Conf
Edit the /opt/keycloak/conf/keycloak.conf file:
db=postgres
db-username=keycloak
db-password=replace-this-with-a-good-password
db-url=jdbc:postgresql://localhost/keycloak
https-certificate-file=/path/to/cert/file.pem
https-certificate-key-file=/path/to/cert/file.key
hostname=example.com
Systemd Service Unit
Since this is on Ubuntu, I created a system unit file to make starting/stopping the server easy. I made this unit file at /etc/systemd/system/keycloak.service
[Unit]
Description=Keycloak Authorization Server
After=network.target

[Service]
User=keycloak
Group=keycloak
ExecStart=/opt/keycloak/bin/kc.sh --config-file=/opt/keycloak/conf/keycloak.conf start
ExecStop=/opt/keycloak/bin/kc.sh stop
Restart=always
RestartSec=3
Environment="KEYCLOAK_ADMIN=admin"
Environment="KEYCLOAK_ADMIN_PASSWORD=very-strong-admin-password"
[Install]
WantedBy=multi-user.target
Then start the server
$ systemctl daemon-reload
$ systemctl enable keycloak.service
$ systemctl start keycloak.service
Once the server is successfully started and you are able to login, go back and edit the keycloak.service file and remove the KEYCLOAK_ADMIN and KEYCLOAK_ADMIN_PASSWORD environment variables, then run the above systemctl commands again to make sure everything is working well.
Configuring Keycloak
By default, Keycloak listens on port 8443 for secure connections. Up to this point, the example server would be accessed at https://example%5Bdot%5Dcom:8443.
Keycloak has a master realm for management of other realms. It is best to create another realm for users to have access to. Create a new realm by clicking the “Keycloak” dropdown menu in the upper left corner and select “Create realm”. I entered the name of the realm as NodePing for this example, but it can be anything. Then I selected “Create” and went to the new realm.

Follow the documentation to create a new user.
Create a Client
To have Keycloak authenticate with NodePing, a new Client needs to be created that can handle all the proper communications. Go to the Clients page and click “Create client”.

Fill out the first page of the new client. The client ID and name can be anything. The Client ID entered here will be part of configuring NodePing.
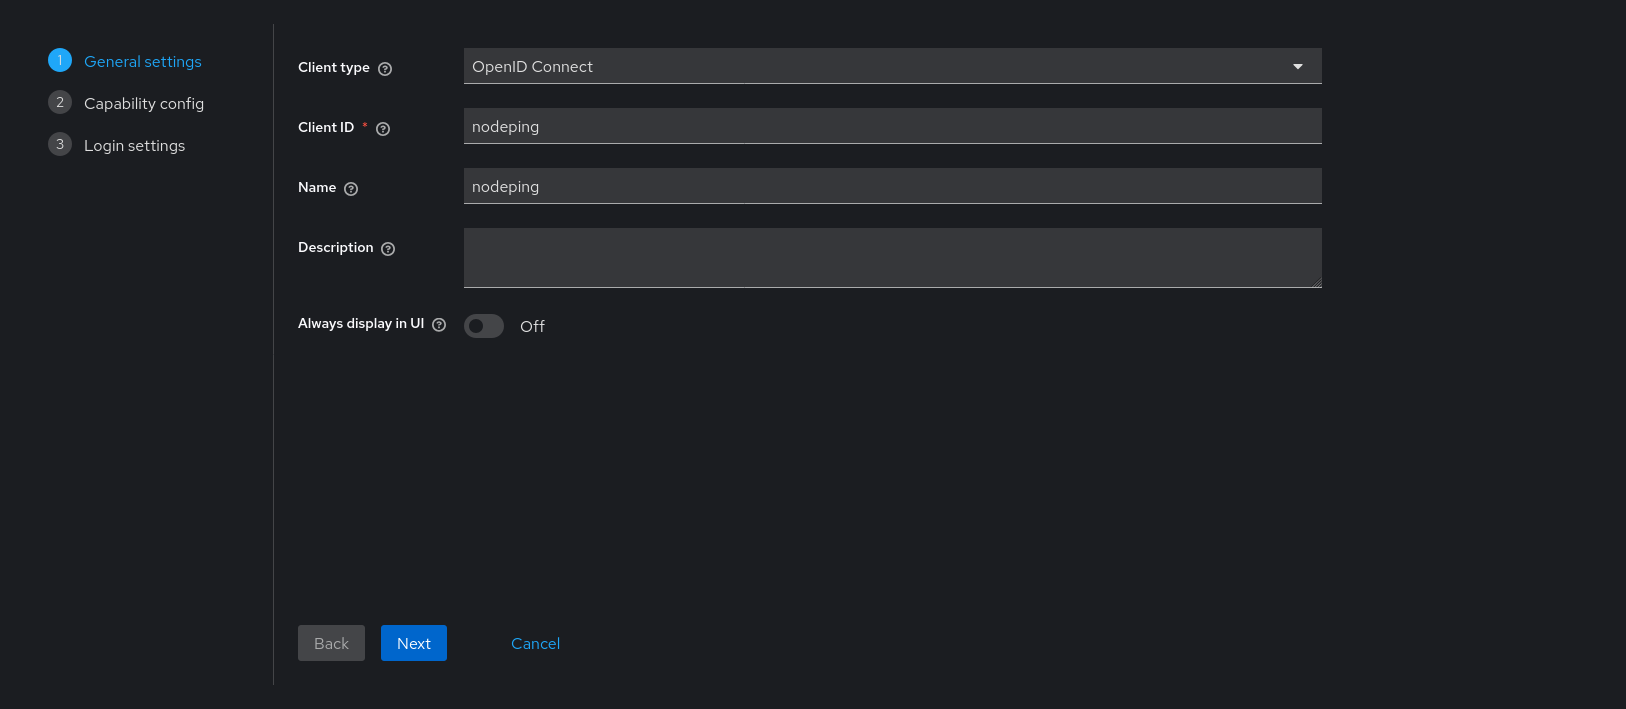
Click next. On page 2, set “Client authentication” to On.

Here, only “Valid redirect URIs” needs a value. It should look like this:
https://app.nodeping.com/authredirect/[your NodePing account id]

Select “Save”. Keycloak is ready to use with NodePing.
NodePing Custom OIDC Configuration
On NodePing, sign in and go to Account Settings -> OpenID Connect
Here, I need:
- The Discovery URL
- The Client ID
- The Client Secret
The Discovery URL can be found in the “Realm Settings” page. Go down to the Endpoints section. Copy the URL named “OpenID Endpoint Configuration”. It should look something like https://example[dot]com:8443/realms/NodePing/.well-known/openid-configuration.
The Client ID is what I entered on the first configuration page when creating the Client. I called it “nodeping”.
Lastly, I need the secret. This is found in the Client information. Go back to Clients -> nodeping -> Credentials. The Client Secret is there. Paste it into the clientSecret section in NodePing and select Save.

NodePing User Auth Types
Now, I can configure a user to sign in with custom OIDC. In NodePing’s webapp, go to Contacts -> List Contacts. I edited the contact I want to permit OIDC authentication with by selecting “Custom OIDC Authentication” as an allowed auth type and saved my contact. This NodePing contact will need the same email address that corresponds with the email address of the Keycloak user.

Next I have to go to a different URL to do my custom OIDC sign in. I visited https://app.nodeping.com/login/[your NodePing account id] and signed in there. This should direct me to Keycloak where I can sign in. If everything worked, I should be back at NodePing and signed in. Alternatively, on the login page I can change the login method to “Custom OIDC Authentication” in the Login Method dropdown menu and enter my NodePing account ID there.
If you run into any troubles, you can reference the previous blog post for information. Additional information is provided in the custom OpenID Connect page to know what information you need to provide and how to login. If any issues arise in configuring Keycloak, Keycloak has a comprehensive server administration guide available.
If you don’t have a NodePing account yet, give it a try! We offer a free, no-obligation 15-day trial. The best way to see if NodePing meets your needs is to try it out.
